Time to Decorate!
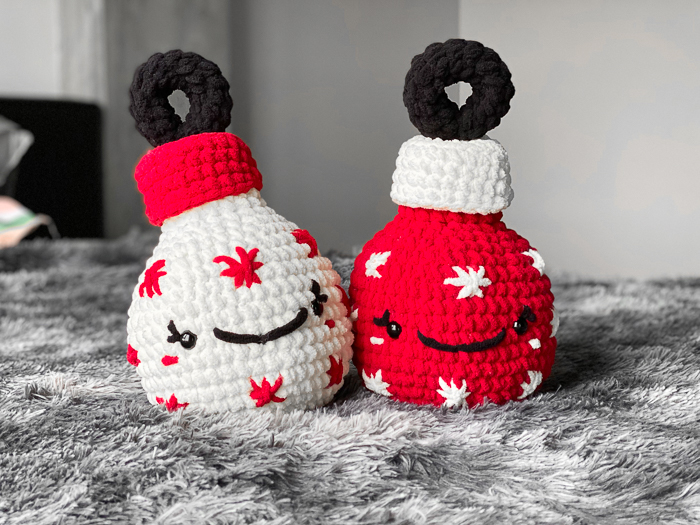
I am going into this holiday season following a very fun trend – Jumbo amigurumi! This might be the new style for a little while, so I hope you enjoy! These jumbo plush make everything seem so cozy and I think that’s the feeling we all want during the winter and especially the holidays. And it’s the perfect kind of yarn we all need to keep our hands warm at the same time as working!
I am teaming up with JOANN to bring you these Jumbo Jingle Ornaments! It’s time to decorate and these are so fun and fast to make so you’re not stuck too long on them. Such a perfect holiday decoration project to have around the house or even some great gifts for your loved ones!
JOANN has everything you need to make these extra special, and nothing screams more special than DIY! The yarn used in this project is Bernat Blanket Yarn and you can find it on the shelves over at JOANN or even order online! Jumbo dolls are here to stay so I recommend you grabbing some. Don’t have the space for it to be huge? This pattern works with any weight yarn, yay!
JOANN still has many other items to make Christmas feel more jolly – I myself am a big component for making gifts. It takes a little longer, sure, but it always feels so meaningful when have someone in mind when creating something. And crochet is no exception! What are you doing fir gifts this year? Let me know in the comments!
If you want to find all my other Christmas patterns for the holidays, click the link HERE

This post was sponsored by JOANN – My favorite craft store to visit for all my yarn and tools that I use. Also, you can’t resist all their coupons!
With my newest project from JOANN, I wanted to create a fun food amigurumi that is a classic to pass around and share with everyone – chicken legs! Or I guess for the occasion, it can also be a turkey leg. Most holidays center us around the table and passing food around to enjoy and I think this cute project could be the cherry on top of the meal.
How will you be showing your loved ones your gratefulness towards them? You can think about that when you head over to JOANN to get all the materials for this really fun project! Down below, you can find the free pattern!
All editorial content and projects are intellectual property of Vincent Green-Hite, designer of Knot Bad.
This post was sponsored by JOANN Stores but all ideas and opinions are my own. Please do not claim this pattern as your own. If you wish to share this pattern, you may link to this pattern but please do not reprint it on your site. You may keep a copy for your own personal use but please DO NOT sell the pattern or distribute it.
You may sell products made from this pattern but please clearly credit the design to Knot Bad and link it my website knotbadami.com Make sure to post it! Use the hashtag #yarnpunk and #handmadewithjoann when posting it and please feel free to tag me and show me how yours turned out! You can also find the Facebook group and subreddit r/yarnpunk to post to as well!
![]()
So here’s what you’ll need, everything can be found at your local JOANN as well!
1 Skein in Bernat Blanket Big Ball Yarn (In Vintage White)
1 Skein in Bernat Blanket Big Ball Yarn (Crimson)
1 Skein in Bernat Blanket Big Ball Yarn (In Coal)
2 x 15mm Safety Eyes
Dimensions
Height: 14″ inches roughly
Width: 8″ inches roughly
Don’t forget to pin this pattern for later! It can be easy to forget so make sure you have this tucked away for a rainy day on your Pinterest Boards!

Skill Level:
Easy
Abbreviations (In US terms)
MR- Magic Ring
Sl st – Slip Stitch
Sc – Single Crochet
Inc – Increase
Dec – Decrease
FLO – Front Loop Only
BLO -Back Loop Only
* *- Repeat
FO – Finish Off
Notes:
- This pattern is worked continuously in the round
- This pattern is written in US terms
- You can find helpful tutorials throughout, but if you would like to find some of my tips and tricks you can head HERE!
- The photo for each step will be found BELOW said step.
- Find my YouTube tutorial for the Magic Ring here!

Let’s Get Started!
Main Body
Begin in Color you want the main Body to be, Red or White.
Rnd 1: 6 Single crochet into Magic Ring (6) (Click here for video tutorial!)
Rnd 2: *Inc* around (12)
Rnd 3: *Sc, Inc* around (18)
Rnd 4: *Sc 2, Inc* around (24)
Rnd 5: *Sc 3, Inc* around (30)
Rnd 6: *Sc 4, Inc* around (36)
Rnd 7: *Sc 5, Inc* around (42)
Rnd 8: *Sc 6, Inc* around (48)
Rnd 9 – 15: Sc around (48)
Rnd 16: *Sc 6, Dec* around (42)
Rnd 17: *Sc 5, Dec* around (36)
Insert safety eyes into round 12 with 9 stitches apart
Begin stuffing firmly!
Rnd 18: *Sc 4, Dec* around (30)
Rnd 19: *Sc 3, Dec* around (24)
Rnd 20: *Sc 2, Dec* around (18)
Rnd 21: Sc in FLO (18)
Rnd 22 – 25: Sc around (18)
Finish off
Lid (Top)
Begin in opposite color of the main body
Rnd 1: 6 Single crochet into Magic Ring (6) (Click here for video tutorial!)
Rnd 2: *Inc* around (12)
Rnd 3: *Sc, Inc* around (18)
Rnd 4: *Sc 2, Inc* around (24)
Rnd 5: Sc around BLO (24)
Rnd 6 – 8: Sc around (24)
Finish off
Handle
Begin in Black
Rnd 1: 6 Single crochet into Magic Ring (6) (Click here for video tutorial!)
Be sure to fill firmly periodically!
Rnd 2 – 15: Sc around (6)
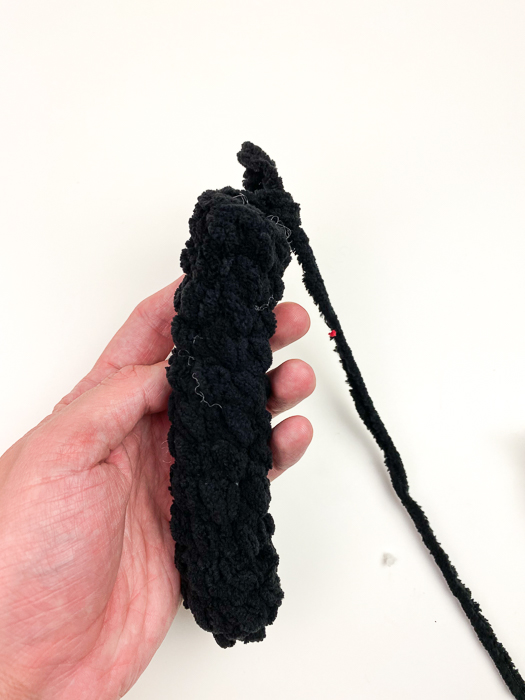

Finish off and sew the two ends of the handle together


Assembly
Here is how my work is looking at this point, it gets a little messy!

To make it easier to sew, I would advise you to sew on the handle onto the lid before you place it on the project! With that said, sew into the center of the lid.

Continue filling your main body piece all the way to the top – with everything filled, you can now snuggly place the lid on top!

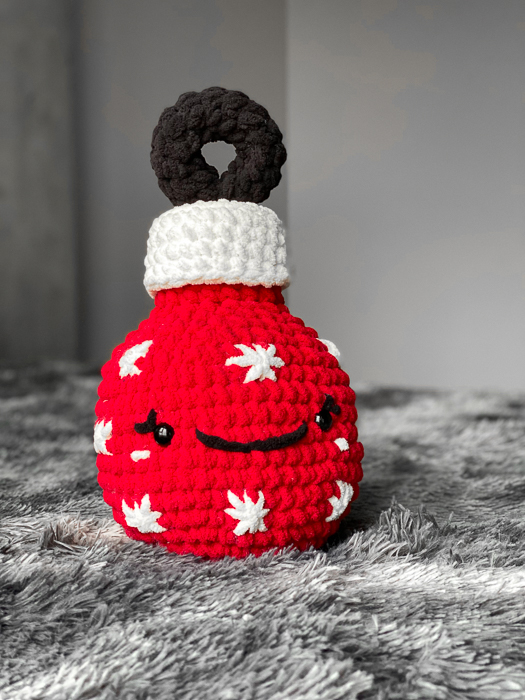
To add the extra detail, we will be embroidering on some snowflakes and face! Placement is subjective but from the front end, you will have 3 snowflakes going across the top and 3 across the bottom with one on each side of the eyes as well – here is a refresher:
To embroider the snowflake, insert your hook with the working yarn from the side and insert through the top left space you will begin:

Move over two spaces and down two spaces (stitches) and insert across:

Do the same parallel – go across and meet into the space that is two away from the top left to create an “x” shape.

Come out through the very side – pull along on top of the x and across the middle:

Coming out from the top center stitches in between the top two, pull through and go through the top of the center:


All done! Continue this around your entire project! And don’t forget to add on your smile and blush. I just used the same colors for the blush as I did for the snowflakes.

I hope you had a blast with this pattern and I hope to see some of them made over on my socials! I want to thank JOANN for sponsoring this project and giving me the opportunity to help bring the holiday joy to your screens and homes!
This post was sponsored by JOANN Stores but all ideas and opinions are my own. Please do not claim this pattern as your own. If you wish to share this pattern, you may link to this pattern but please do not reprint it on your site. You may keep a copy for your own personal use but please DO NOT sell the pattern or distribute it.
You may sell products made from this pattern but please clearly credit the design to Knot Bad and link it my website knotbadami.com Make sure to post it! Use the hashtag #yarnpunk and #handmadewithjoann when posting it and please feel free to tag me and show me how yours turned out! You can also find the Facebook group and subreddit r/yarnpunk to post to as well!
What a great idea and extremely easy to follow pattern! Thank you and well done on this trend. I’ll be making this and I’m thinking of putting a weight in the bauble to use as a doorstop