
This post was sponsored by JOANN – My favorite craft store to visit for all my yarn and tools that I use. Also, you can’t resist all their coupons!
Happy National Craft Month!
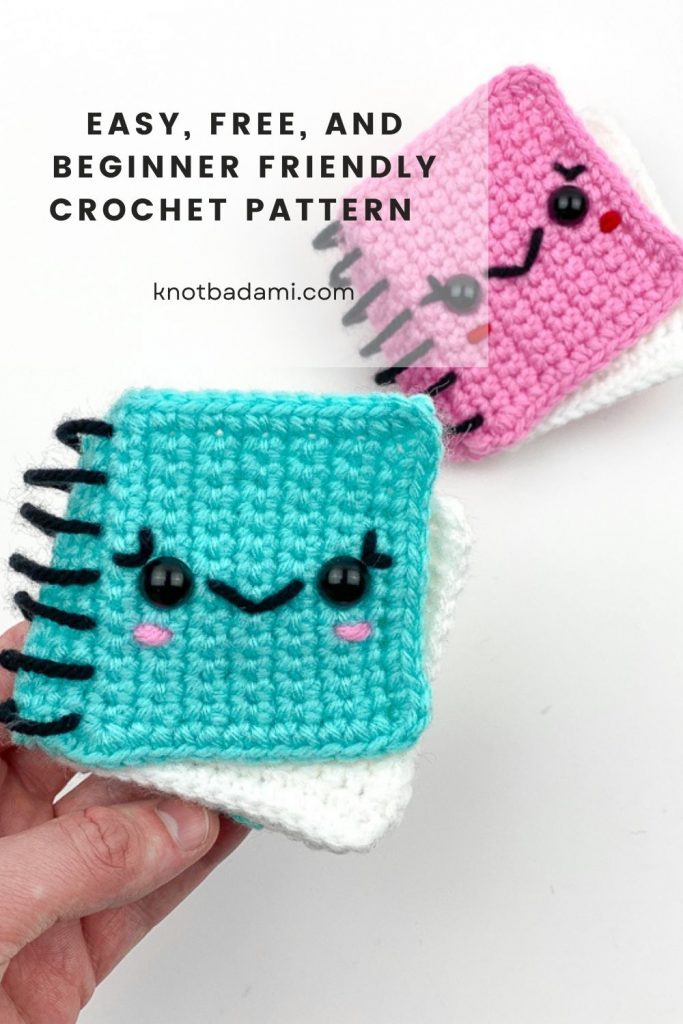
March is National Craft Month and I am so excited to be able to share a free pattern that you can get started on! I wanted to make an item that reminds me of all crafts and my first idea that comes to mind is a journal. My explanation for this is because before we start projects (at least what I do) is write / sketch them down in a notebook before getting started.
It’s always fun to see the humble beginnings (as a sketch) of our projects and I think it’s a great way to organize your thoughts and come up with a concrete idea. I actually still have notebooks when I started crocheting all the way back in 2016. Do you prefer using a physical or digital notebook?
I wanted to make these small and easy so everyone can access this pattern no matter your skill level. It doesn’t take too long and it’s all worked flat, no need to work in the magic ring if that is something you struggle with. Sometimes we need to have those projects that can be finished quickly – there’s just too many other projects you can make from what you can find from JOANN!
JOANN makes it so easy to come up with new ideas and I hope this beginner friendly crochet project could be a gateway in maybe picking up another hobby? After making something like this, the thought of trying out bullet journaling came to mind. Let me know down below in the comments if this inspires you to try out journaling!
Where do you keep your crochet ideas?
JOANN is always helping me spark my creativity with all the materials they have in their stores and online. It actually took me walking down multiple isles in the store to come up with this pattern. I didn’t realize how different journals and notepads could look!
JOANN is my go to when it comes to materials, especially the yarn I use! As a blogger, creating my own designs is made easy with them. You’ll see below that I have a favorite yarn – I am excited for you to try it out. (Spoilers: It’s Big Twist Value)
If you have experience with single crocheting and a little bit of sewing, this pattern will be more than accessible for you. You can now get started on this pattern for FREE with all the written and photo instructions down below. You have the opportunity to make the book as many pages as you wish and even swap out colors you best see fit.
Of course, everything you see in this pattern will be adjustable to your own liking. The colors you choose to the face you create is all up to you!

This pattern is perfect for you if:
- You don’t want to work in the round
- You want a quick project you can finish in a day
- You’re looking for an easy to learn crochet pattern
I can’t wait to see what you write in yours!

So where can you find what you need?
You can find every single thing I used for this project from JOANN stores and you will see all of that hyperlinked for you. JOANN is my favorite place to go for materials and the yarn I love the most for amigurumi can be exclusively found there as well. When purchasing, I earn a little bit of the commission, so thank you for supporting me as a blogger!
All editorial content and projects are intellectual property of Vincent Green-Hite, designer of Knot Bad.
This post was sponsored by JOANN Stores but all ideas and opinions are my own. Please do not claim this pattern as your own. If you wish to share this pattern, you may link to this pattern but please do not reprint it on your site. You may keep a copy for your own personal use but please DO NOT sell the pattern or distribute it.
You may sell products made from this pattern but please clearly credit the design to Knot Bad and link it my website knotbadami.com Make sure to post it! Use the hashtag #yarnpunk and #handmadewithjoann when posting it and please feel free to tag me and show me how yours turned out! You can also find the Facebook group and subreddit r/yarnpunk to post to as well!
My other social media platforms you can find me at:
Instagram: @knot.bad
Tik Tok: @knotbad
Twitter: @knotbadcrochet

So here’s what you’ll need:
All the yarns can be substituted with any jumbo weight yarn (size 4)
These colors will be interchangeable and identified with Color A and Color B to decide which kind you would like to make.
- 1 Skein in Big Twist Value Aqua (Color A)
- 1 Skein in Big Twist Value Watermelon (Color A)
- 1 Skein in Big Twist Value White (Color B)
- 1 Skein in Big Twist Value Black
- 1 Skein in Big Twist Value Pink
- 1 Skein in Big Twist Value Varsity Red

Dimensions
Height: 3.75″ inches
Width: 3.75″ inches

Enjoy what I do? You can send me a tip if you would like or even follow me on Ko-fi!

Skill Level:
Easy
Abbreviations (In US terms)
Sl st – Slip Stitch
Ch – chain
Sc – Single Crochet
Inc – Increase
* *- Repeat
FO – Finish Off
( ) – Number of stitches

Don’t forget to pin this pattern for later! It can be easy to forget so make sure you have this tucked away for a rainy day on your Pinterest Boards.
Notes:
- This pattern is worked flat in the row
- This pattern is written in US terms
- You can find helpful tutorials throughout, but if you would like to find some of my tips and tricks you can head HERE!
- Find my YouTube tutorial for the Magic Ring here!
- ****The photo for each step will be found BELOW explanation.

Lets Begin!
Front and Back Cover (Make 2)
Begin in Color A
Ch 15
Row 1: In 3rd chain from hook, sc. Sc across (13)
Row 2 – 13: Ch 1, turn. Sc across (13)
(Border)
Ch 1, single crochet into the first stitch on the side of your work. Sc x 2 into same stitch (3 sc total in the first stitch.)

Continue to sc across the edge until the first corner.

Into the corner stitch, sc x 3. (Your work will begin to turn)

Repeat round 2 for the next 2 sides and corners
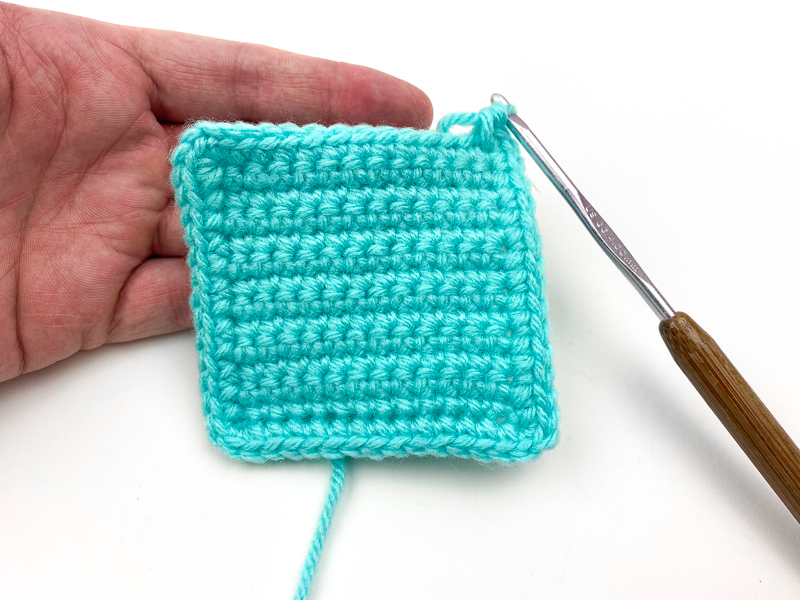
Sc across final side until final corner. Single into the first stitch of your initial Sc x 3. Sl st into the center stitch of the Sc x 3. Finish off and leave tail for sewing.


Pages (Make 2 panels)
*You can make more pages depending how thick you want your book to be!
Ch 15
Begin in White
Row 1: In 3rd chain from hook, sc. Sc across (13)
Row 2 – 13: Ch 1, turn. Sc across (13)
(Border)
- Ch 1, single crochet into the first stitch on the side of your work. Sc x 2 into same stitch (3 sc total in the first stitch.)
- Sc across until the first corner. Into the corner stitch, sc x 3. (Your work will begin to turn)
- Sc across until the corner stitch. Sc into the corner stitch until last 2 loops. Pull the blue yarn through. Sc x 2 into the same stitch.


Work will begin to turn, sc across. Into the corner stitch, Sc. Sc again until last 2 loops. Pull your white yarn through, sc once more.
Sc across until corner (Just as we did in the last step of the covers).

Assembly
Seaming together
With all 4 of your panels, lay on top of one another. The two solid color panels will be on top and bottom and the white “pages” will both be in the center, with the colored edge on the same side.

Your stitches will be vertical (the lines are up and down) rather than horizontal. This will be important for your safety eyes!


With your darning needle and tail, pull through all 4 panels in the first corner. Making sure your front panels stitches are vertical.

Instead of going back and forth with our needle, we will go from the the same direction as we started (right to left seen from the photo below) through all 4 panels. Your yarn will be “looping” over (seen below)

A loop will be created, pull snug.
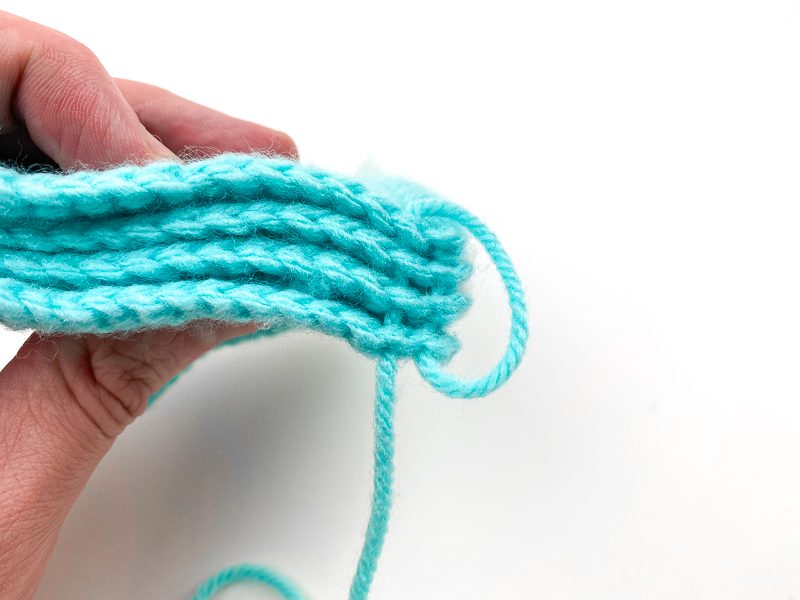
Continue this same process into each stitch working along to the end. Looping your yarn over and pulling snug – in the photo below will be how your work should be looking

All done! Weave in your ends.


When you open up you book, here is how how your stitching will look on the inside:

You will be able to flip through the pages.

Creating the book rings
Using a good length of black yarn (I would suggest about 35 – 40″ inches), insert your needle into the first stitch at the top of your journal

Swoop around and reinsert your yarn through the same stitch – you will be going through both panels but from an angle (Leaving 1 stitch in between from the first)

This will create a loop. Pull slowly and leave a little bit of slack. Do not pull all the way.

Going through from the back, insert the needle and go at an angle through the front layer with 1 stitch apart again. Pull slowly and leave some slack. See how this will look down below!

Be sure to keep one stitch between each loop!

And here is how your final cover bindings will look!

Attaching Safety Eyes
From the bottom row, you will insert your safety eyes into 7 rows up and 7 stitches between each safety eye.
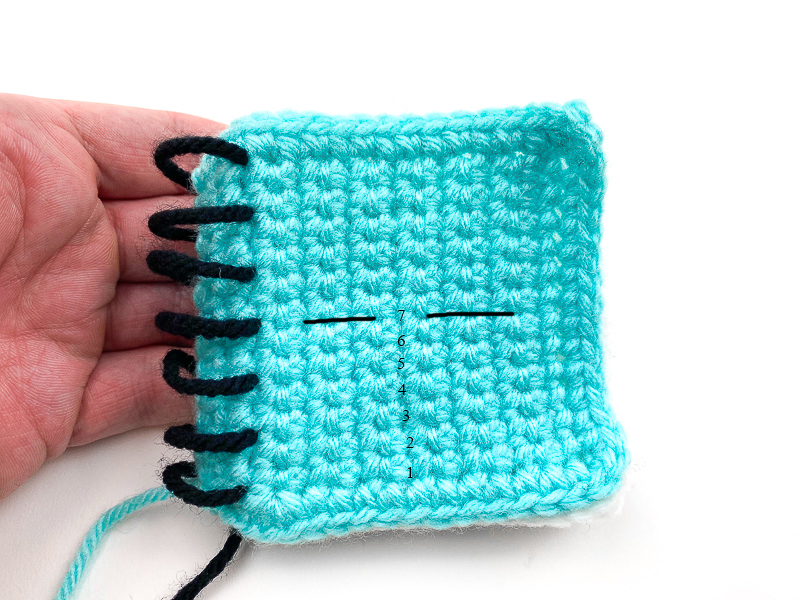

When finding a place to secure hide your other colored yarn (such as black) you can weave the the back loops of the stitches:
With your darning needle, embroider on the face – with a smile, eyelashes, and blushes cheeks!
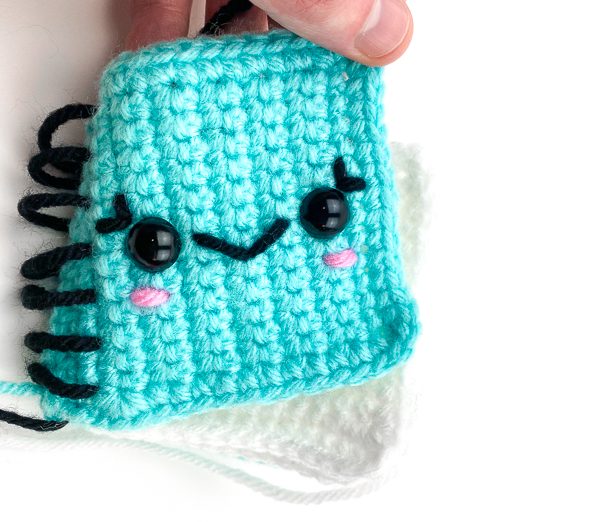
As you’ll see, the back might look a little bit messy.. but you wont need to worry about that much as we will have a solution!

Time to hide everything!
We will be sewing our front cover to the first page of the book. This allows us to achieve two things:
- Lets us hide all of the messiness from the face
- It creates the effect when facing forward that it is a book and that it contains pages! Just from the front, it may not give you the full idea (This part is optional)
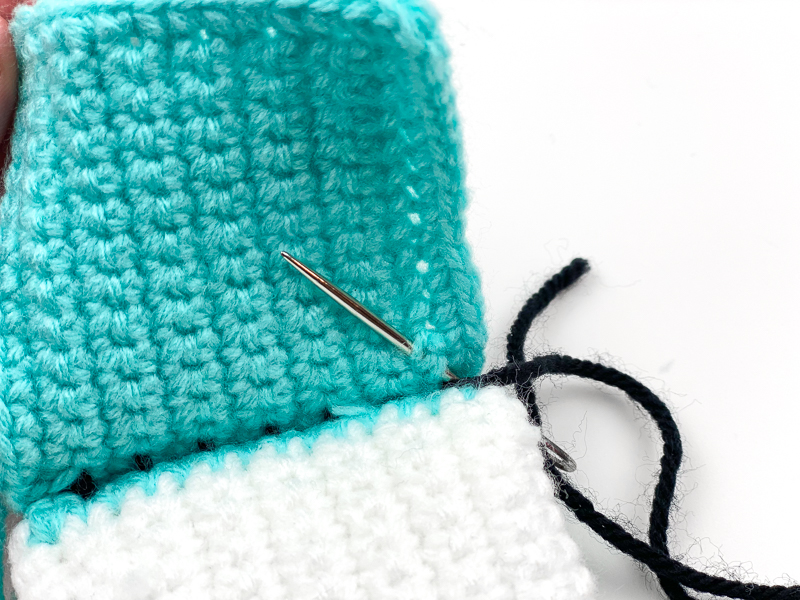
With the cover, pull it “upward” so the the white pages show. (Seen in photo below)

Attach a strand of white yarn into the white panel, underneath where the Color A corner would be in the example above.
Thread the needle through the blue panel, but ONLY in the back loops of each stitch (seen in photo 2) You will seam so it doesn’t show on the front cover.


With your needle, insert back into the white page. Pull your needle back through and connect with the back loops of the stitches on the cover.


Continue this process all the way along – since we want the paper showing, you will be sewing together in “\” shape

Pull yarn through and weave in your ends. Both panels should be securely fastened now.

And now the page should be showing when completed

(Completely optional) You can also embroider your own image or words on the page of your notebook! As you did the face, use your darning needle to pull through desired stitches.

And now you’re done!! I really hope you enjoyed this pattern – this pattern will be even faster the more you make when you get the hang of it.

I hope you had a good time with this pattern and want to make more than just one! Cant wait to see how yours turn out – feel free to tag my social medias to show me how it turned out. I want to thank JOANN stores for helping inspire this project to bring to all of my readers! I appreciate everyone so much.
All editorial content and projects are intellectual property of Vincent Green-Hite, designer of Knot Bad.
This post was sponsored by JOANN Stores but all ideas and opinions are my own. Please do not claim this pattern as your own. If you wish to share this pattern, you may link to this pattern but please do not reprint it on your site. You may keep a copy for your own personal use but please DO NOT sell the pattern or distribute it.
You may sell products made from this pattern but please clearly credit the design to Knot Bad and link it my website knotbadami.com Make sure to post it! Use the hashtag #yarnpunk and #handmadewithjoann when posting it and please feel free to tag me and show me how yours turned out! You can also find the Facebook group and subreddit r/yarnpunk to post to as well!
My other social media platforms you can find me at:
Instagram: @knot.bad
Tik Tok: @knotbad
Twitter: @knotbadcrochet


This is adorable. Thank you, my 10 year old granddaughter will love it.
Linda