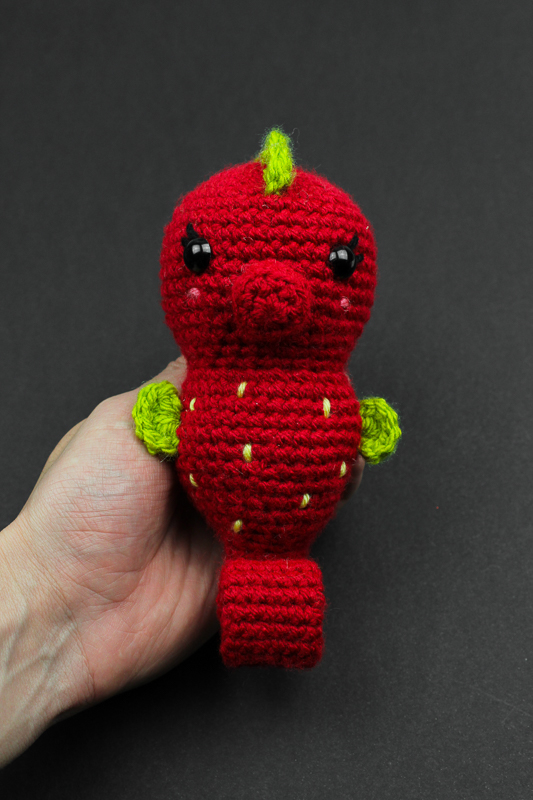
Summer is just around the corner and even though they exist all year round, a very cute horse of sorts starts to pop into the minds of a “summer animal”… the Seahorse! Thanks to Clover USA, I was able to bring one to life! It’s so sweet but this seahorse in particular ate something that hasn’t quite digested.. can you guess what was for lunch?
A strawberry! You can see it all over it’s belly – Evolution has taken sort of a weird turn. Strawberry body with leaf fins? Okay, using Clover’s hooks to make this amigurumi was too much fun. Thanks to Clover, creativity is not hard to achieve when you have the proper tools! My magic wand here is my 4mm hook.
Today in partnership with Clover USA, you can find the free pattern the Strawberry Seahorse down below! Get started on your own and be sure to get everything you need from Clover USA!

All editorial content and projects are intellectual property of Vincent Green-Hite, designer of Knot Bad. This post was sponsored by Clover USA but all ideas and opinions are my own.
Want to create all three variations? you can purchase the patterns on Etsy and Ravelry!

So here’s what you’ll need:
1 Skein in Lion Brand’s Basic Stitch Premium (In Raspberry)
1 Skein in Lion Brand’s Basic Stitch Premium (In Black)
1 Skein in Big Twist (in green)
- Any worsted weight yarn will work for all these colors!
Dimensions
Height: 6″ inches
Width: 3″ inches
Skill Level: Easy

Abbreviations:
Ch – chain
Sl st – Slip Stitch
Sc – Single Crochet
Dc – Double Crochet
FLO – Front Loop Only
BLO – Back loop only
* *- Repeat
FO -Finish Off
Gauge:
Isn’t needed for this project


Let’s Begin!
Main body (being in red)
Rnd 1: 6 Single crochet into Magic Ring (6)
Rnd 2: *Inc* around (12)
Rnd 3: *Sc, Inc* around (18)
Rnd 4: *Sc 2, Inc* around (24)
Rnd 5: *Sc 3, Inc* around (30)
Rnd 6: *Sc 4, Inc* around (36)
Rnd 7: *Sc 5, Inc* around (42)
Rnd 8-14: Sc around (42)
Insert safety eyes into Rnd 11 with 8 stitches apart
Rnd 15: *Sc 5, Dec* around (36)
Rnd 16: *Sc 4, Dec* around (30)
At this point, you will want to begin stuffing the head firmly!
Rnd 17: *Sc 3, Dec* around (24)
Rnd 18: *Sc 2, Dec* around (18)
Rnd 19: *Inc* around in the FLO (36)
Rnd 20-24: Sc around (36)
Rnd 25: *Sc 4, Dec* around (30)
Be sure you’re stuffing the body!
Rnd 26: Sc around (30)
Rnd 27: *Sc 3, Dec* around (24)
Rnd 28: Sc around (24)
Rnd 29: *Sc 2, Dec* around (18)
Rnd 30: Sc around (18)
rnd 31: *Sc 1, Dec* around (12)
You will NOT be stuffing the tail
Rnd 32 – 55: Sc around (12)
Finish off and leave tail
When sewing tail into it’s position, curl your tail as tight as you would like, use your tail to sew through all layers and then knot off in the back!

Head scales
Attach yarn to the top of the head (Row 7)
Attach, ch 1. In next stitch, *Dc x 4. sk st, sl st, ch 1, dc x 3.* Until Rnd 18, or 6 times in total
(Photo tutorial below!)


Side Fins
Attach yarn to side of project (into Round 23!)
Dc x 6
Back fins:
Attach yarn into the back side.
Dc x 6, sl st into next stitch, ch 1, Dc x 6 into next stitch
Finish off

Nose
Rnd 1: 6 Single crochet into Magic Ring (6)
Rnd 2: *Sc, Inc* around (9)
Rnd 3: Sc in BLO (9)
Rnd 4: Sc around (9)
Finish off and leave tail

Please do not claim this pattern as your own. If you wish to share this pattern, you may link to this pattern but please do not reprint it on your site. You may keep a copy for your own personal use but please DO NOT sell the pattern or distribute it.
You may sell products made from this pattern but please clearly credit the design to Knot Bad and link it my website knotbadami.com
Make sure to post it! Please feel free to tag me and show me how yours turned out!
Awe!!!! Oh em geeeee!!!! This is so super cute, Vincent!!!! I love it so much!!!! Thank you for sharing your beautiful masterpiece with us!
With lots of love, hugs & kisses,
Mrs. Lil Ol Lady Lane
🌹♥️