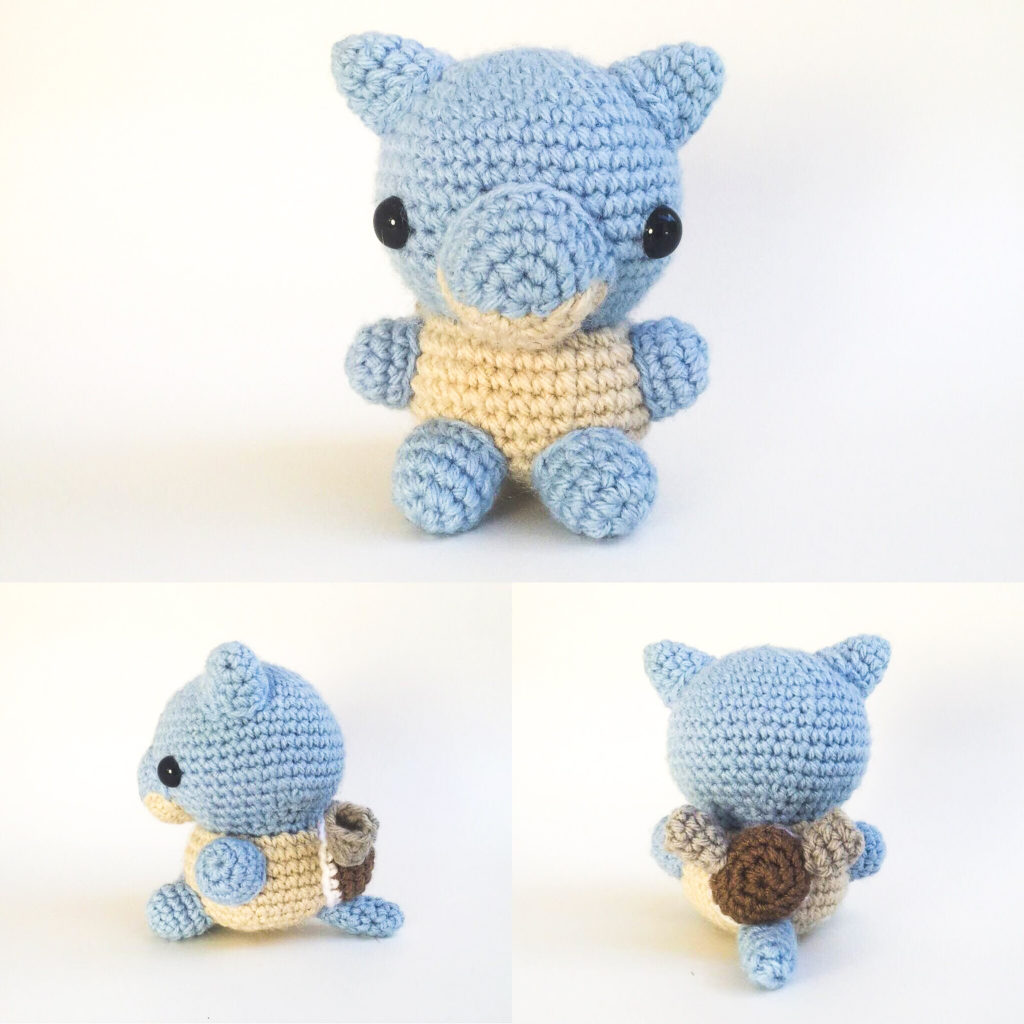
If you’ve been following me for a long time, you’ll know that I actually got a start with my crochet and blogging career thanks to Pokemon! I’ve been playing the games for about 20 years and will probably keep playing until my death bed.
Squirtle has always been a fan favorite to so many, so I decided to recreate his evolution; Blastoise! Down below, you can find the free pattern!

Terminology:
Ch Chain
St Stitch
sc Single crochet
Inc Increase, 2 sc in the same space
Dec Decrease, single crochet 2 together
You will need:
US 4 mm hook (any size will be okay, but this is what the picture is made in. Size of hooks determine the size!)
Worsted Weight Yarn in desired colors ( I highly recommend using Lion Brand’s Vanna’s Choice, which is always my go-to for Amigurumi!
Yarn needle for sewing
Stitch marker
Fiberfill for stuffing
Two 12mm safety eyes
Head/Body:
(Begin in Light Blue)
Rnd 1: Magic Ring 6 (6)
Rnd 2: *Inc* around (12)
Rnd 3: *Sc, Inc* around (18)
Rnd 4: *Sc 2, Inc* around (24)
Rnd 5: *Sc 3, Inc* around (30)
Rnd 6: *Sc 4, Inc* around (36)
Rnd 7: *Sc 5, Inc* around (42)
Rnd 8-14: Sc around (42) *Place eyes in row 12, 8 stitches apart* *It might be helpful to sew on the snout so you know where the eyes will look best!*
Rnd 15: *Sc 5, Dec* around (36)
Rnd 16: *Sc 4, Dec* around (30)
Rnd 17: *Sc 3, Dec* around (24)
Rnd 18: *Sc 2, Dec* around (18)
Rnd 19: Switch to Beige,*Inc* around in Front Loop only (36) Begin stuffing head firmly
Rnd 20-24: Sc around (36)
Rnd 25: *Sc 4, Dec* around (30)
Rnd 26: *Sc 3, Dec* around (24)
Rnd 27: *Sc 2, Dec* around (18)
*You can stuff the body now or wait till the end. Don’t stuff the body as firmly as the head. Let the body be a little squishy so it can sit!**
Rnd 24: *Sc, Dec* around (12)
Finish off and leave tail to close hole

Arms (Make 2)
(Begin in light blue)
Rnd 1: Magic Ring 6 (6)
Rnd 2: *Inc* x 6 (12)
Rnd 3-4: Sc around (12)
Finish off and leave long enough tail to attach
Legs (Make 2)
(Begin in light blue)
Rnd 1: Magic Ring 6 (6)
Rnd 2: *Inc* x 6 (12)
Rnd 3-5: Sc around (12)
Finish off and leave long enough tail to attach

Ears (Make 2)
(Begin in black)
Rnd 1: Magic Ring 4 (4)
Rnd 2: *Inc* around (8)
Rnd 3: Sc around (8)
Rnd 4: *Sc, Inc* around (12)
Rnd 5: *Sc 2, Inc* around (16)
Finish off and leave long enough tail to attach
Snout
You will be switch colors in the middle of each round!
Rnd 1: Begin in blue, 3 sc into magic ring, switch to beige, 3 more sc. (6)
Rnd 2: Inc in the next 3 stitches with light blue, switch to beige, inc into next 3 stitches around (12)
Rnd 3: *Sc, Inc* in light blue for the next 9 stitches, switch to beige and
*Sc, Inc* around (18)
Rnd 4-5: Start in blue and sc into the next 9 sticthes, switch to beige and sc until end of round (18)
Finish off and leave long enough tail to attach for both colors
Shell
(Begin in brown)
Rnd 1: Magic Ring 6 (6)
Rnd 2: *Inc* around (12)
Rnd 3: *Sc, Inc* around (18)
Rnd 4: Sc around (18)
Rnd 5: Switch to white, Sc around (18)
Finish off and leave long enough tail to attach
Cannons (Make 2)
(Begin in grey)
Rnd 1: Ch 8
Rnd 2: Sc into first sc to connect. Ch 1, sc 7 around. (7)
Rnd 3-5: Sc around (7)
Finish off and leave long enough tail to attach

Tail
(Begin in light blue)
Rnd 1: Magic Ring (5)
Rnd 2: *Sc 4, Inc* around (6)
Rnd 3: Sc around (6)
Rnd 4: *Sc 5, Inc* around (7)
Rnd 5: *Sc 6, Inc* around (8)
Rnd 6: *Sc 7, Inc* around (9)
Rnd 7: Sc around (9)
You may not sell my patterns or claim them as your own. You may make items to sell(i.e. on Etsy, at craft fairs) from my patterns but I ask that you link back to my blog and provide credit for the pattern. You are welcome to share my patterns on social media so long as you link back directly to my blog post(providing the link). No copy & paste of my patterns will be allowed under any circumstances.
Be sure to tag @knot.bad and @yarnpunk on your socials and use the hashtag #yarnpunk!

