This post was sponsored by JOANN – My favorite craft store to visit for all my yarn and tools that I use. Also, you can’t resist all their coupons!
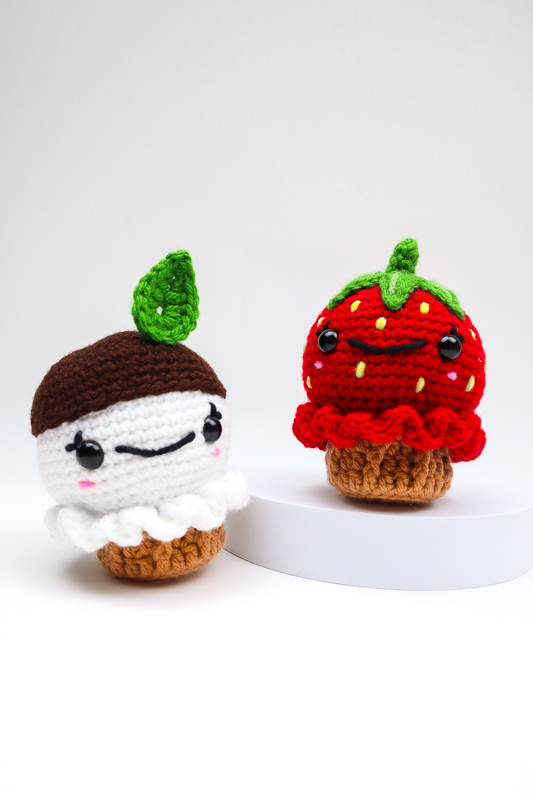
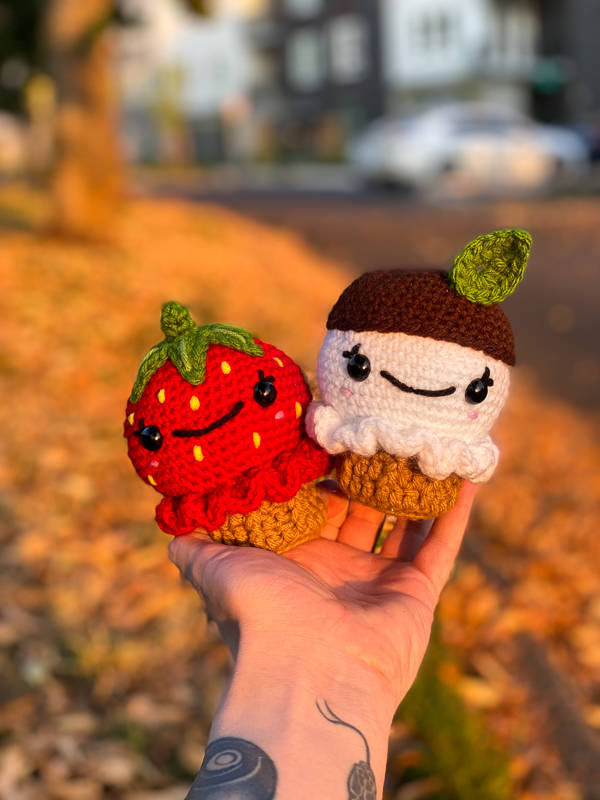
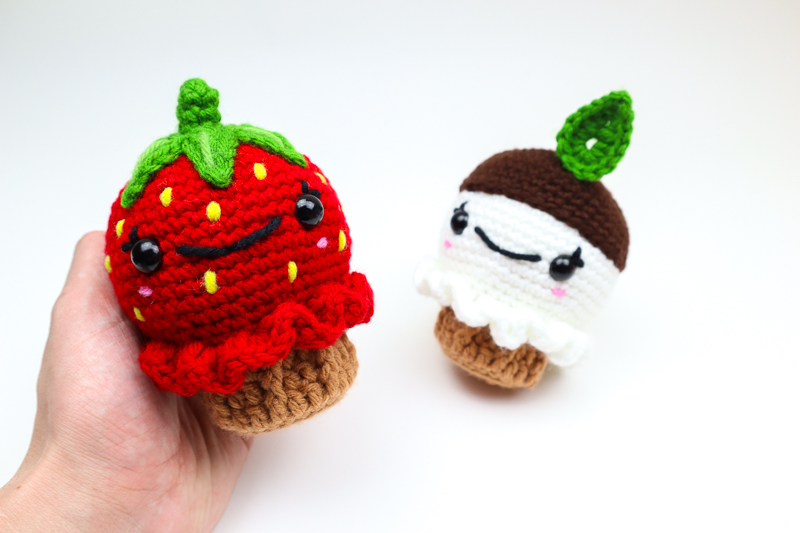
It’s summer and it’s time to go pluck our gardens from our harvest and make dessert out of them. And these Garden Tarts do just that – so cute I just want to teat them up!
There’s a lot of ideas going on with this fun design so bare with me while I try to explain – the original idea was to take ice cream cones and take the flavor a little too literally. I started off with the strawberry flavor and rolled with it all the way until I was creating the “cone” part of the design. There’s a ton of other ice cream patterns out there so I wanted to make sure I could adjust the cone to look a little bit more my style. I was able to find the yarn and colors I needed when I stopped by JOANN so I was feeling confident with what materials I had.
After getting a cone I was happy with and textured enough (tutorial and explanation will be below) I sewed it on and had a complete piece! I thought it was very cute but.. something just wasn’t looking right to me. I think the cone was maybe not looking like a cone at this point and maybe it was too tall?
I widened the textured parts of the cone and then I reduced the height of the cone – it didn’t look like an ice cream as much anymore but for some reason I was happy about how cute it was looking. After a moment, it dawned on me that it looks like a tart. Yum!

Do Coconuts grow in a garden?
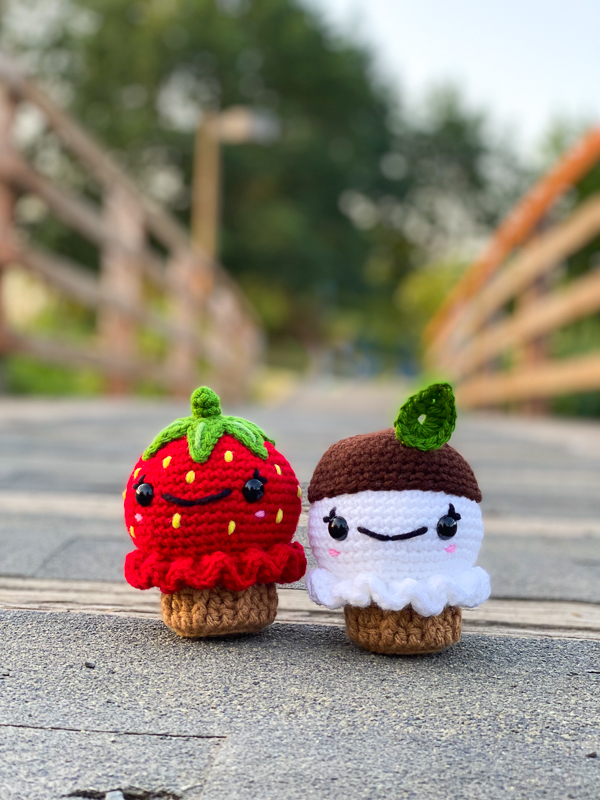
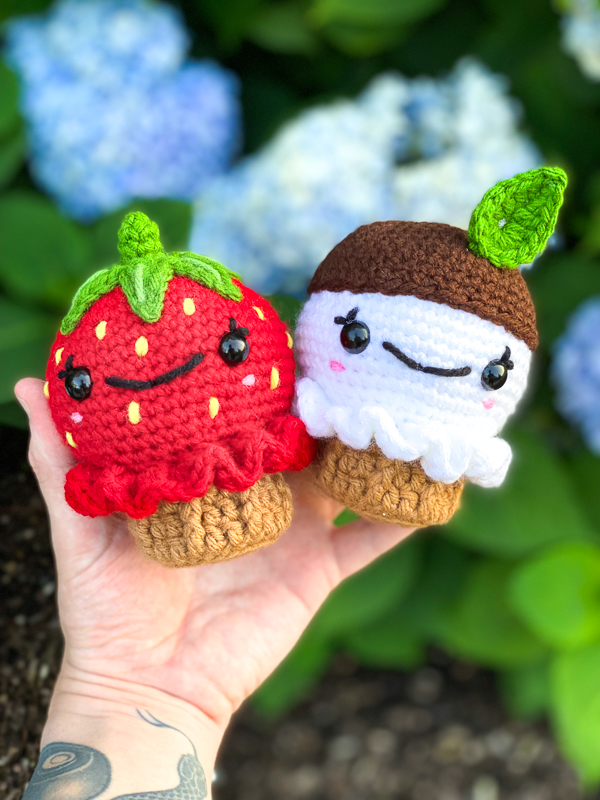
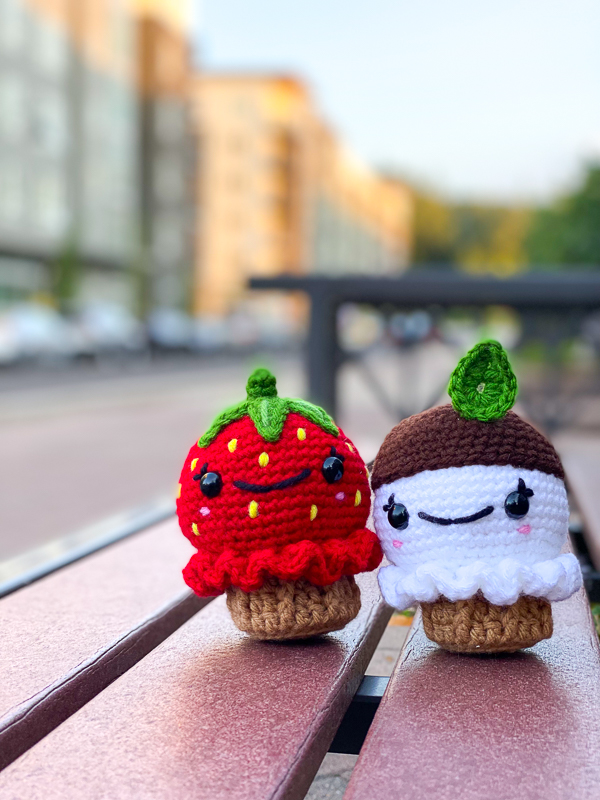
Seeing it’s personality, I think these look like characters – so with that, I am calling these my Garden Tarts. We have strawberry and coconut as our flavors! I think they’re quirky enough to work. Do you still think they look like Ice Cream Cones? I want you to be able to interpret this fun summer pattern however you wish!
My goal was to make this project cute enough to eat and I hope I have achieved this! This pattern is a ton of fun to make and I believe you’ll love it when it’s done too. JOANN makes it so easy and freeing to play with your own creativity in any way you like. With what they offer, I bet you could come up with a really cute variation of this pattern yourself.
Ready to learn a new stitch?
The double crochet is a classic crochet stitch and has loved through the ages – while its been so popular, they’re have many techniques by using it in different ways! With this pattern, you’ll learn how to manipulate the double crochet to creates a wave-style stitch as well as working in the front post to create texture.
You will be able to find the full pattern down below with all the written and photo instructions to get started. You will also be able to find all the materials I used from JOANN stores as well!
JOANN is always trying to help me find ways to help you want to keep discovering your crochet passion. They’ve become my go to when it comes to materials, especially the yarn I use!
This project takes more yarn than my typical dolls so be prepared – Big Twist Value from JOANN is my top recommendation (You will find the colors I sued down below) As a blogger, creating my own designs is made easy with JOANN.
(Find my full review of the yarn here)
Other criteria someone might meet who would enjoy this project:
- Someone looking to try out a fun summer pattern
- Strawberry lovers
- Someone looking to make a gift
- Someone who wants to learn how to use the double crochet in 2 different ways
So where can you find what you need?
You can find every single thing I used for this project from JOANN stores and you will see all of that hyperlinked for you. JOANN is my favorite place to go for materials and the yarn I love the most for amigurumi can be exclusively found there as well. When purchasing, I earn a little bit of the commission, so thank you for supporting me as a blogger!
If you’re looking for the perfect project to get ready for the warmer months, I think this is a great way to kick it off. This is a user friendly way to learn a brand new stitch while creating a fun doll with JOANN’s yarn
All editorial content and projects are intellectual property of Vincent Green-Hite, designer of Knot Bad.
This post was sponsored by JOANN Stores but all ideas and opinions are my own. Please do not claim this pattern as your own. If you wish to share this pattern, you may link to this pattern but please do not reprint it on your site. You may keep a copy for your own personal use but please DO NOT sell the pattern or distribute it.
You may sell products made from this pattern but please clearly credit the design to Knot Bad and link it my website knotbadami.com Make sure to post it! Use the hashtag #yarnpunk and #handmadewithjoann when posting it and please feel free to tag me and show me how yours turned out! You can also find the Facebook group and subreddit r/yarnpunk to post to as well!
My other social media platforms you can find me at:
Instagram: @knot.bad
Tik Tok: @knotbad
Twitter: @knotbadcrochet
So here’s what you’ll need:
All the yarns can be substituted with any jumbo weight yarn (size 4)
These colors will be interchangeable and identified with Color A and Color B to decide which kind you would like to make.
- 1 Skein in Big Twist Value Varsity Yellow
- 1 Skein in Big Twist Value Forest Green
- 1 Skein in Big Twist Value Light Green
- 1 Skein in Big Twist Value Deep Red
- 1 Skein in Big Twist Value Pink
- 1 Skein in Big Twist Value Camel

Enjoy what I do? You can send me a tip if you would like or even follow me on Ko-fi!
Skill Level:
Easy+
Dimensions
Height: 5″ inches roughly
Width: 4″ inches roughly
Abbreviations (In US terms)
Sl st – Slip Stitch
Ch – Chain
Sc – Single Crochet
Hdc – Half Double Crochet
Dc – Double Crochet
Inc – Increase
Inv dec – Invisible Decrease
FLO – Front Loop Only
* *- Repeat
FO – Finish Off
( ) – Number of stitches
Notes:
- This pattern is worked continuously and not joined.
- This pattern is written in US terms
- You can find helpful tutorials throughout, but if you would like to find some of my tips and tricks you can head HERE!
- The photo for each step will be found BELOW explanation.
- Find my YouTube tutorial for the Magic Ring here!
Let’s Begin
Main Body for the Strawberry and Coconut (Head)
Begin in Red or White (depending which one you want to create)
Rnd 1: 6 Single crochet into Magic Ring (6) (Click here for video tutorial!)
Rnd 2: *Inc* around (12)
Rnd 3: *Sc, Inc* around (18)
Rnd 4: *Sc 2, Inc* around (24)
Rnd 5: *Sc 3, Inc* around (30)
Rnd 6: *Sc 4, Inc* around (36)
Rnd 7: *Sc 5, Inc* around (42)
Rnd 8: *Sc 6, Inc* around (48)
Rnd 9 – 16: Sc around (48)
Rnd 17: *Sc 6, Inv Dec* around (42)
Rnd 18: *Sc 5, Inv Dec* around (36)
Rnd 19: *Sc 4, Inv Dec* around (30)
Rnd 20: (This step will be written out completely – down below will be the photo tutorial involving these steps) Into the first stitch, *Dc x 2 in FLO. Into the following stitch, Dc x 5 into the FLO” Repeat from * all the way around.
Insert your first double crochet into the Front Loop Only of your stitch
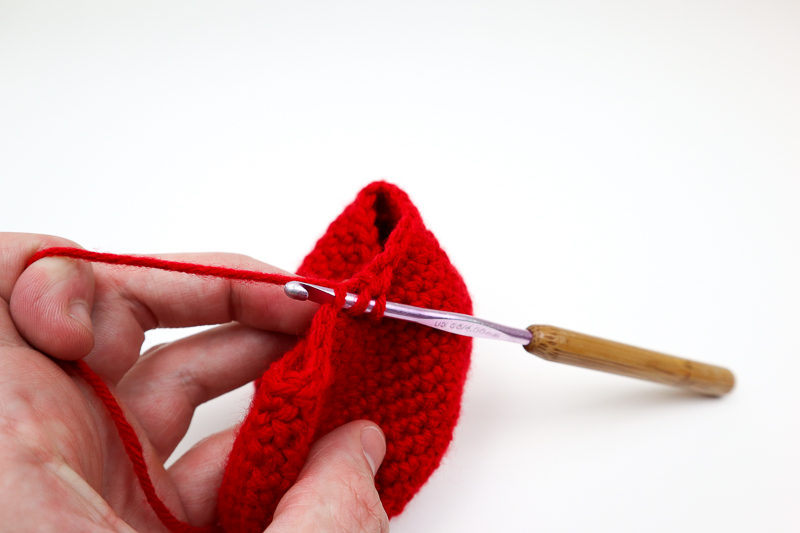
After your first dc, dc once again into the same stitch
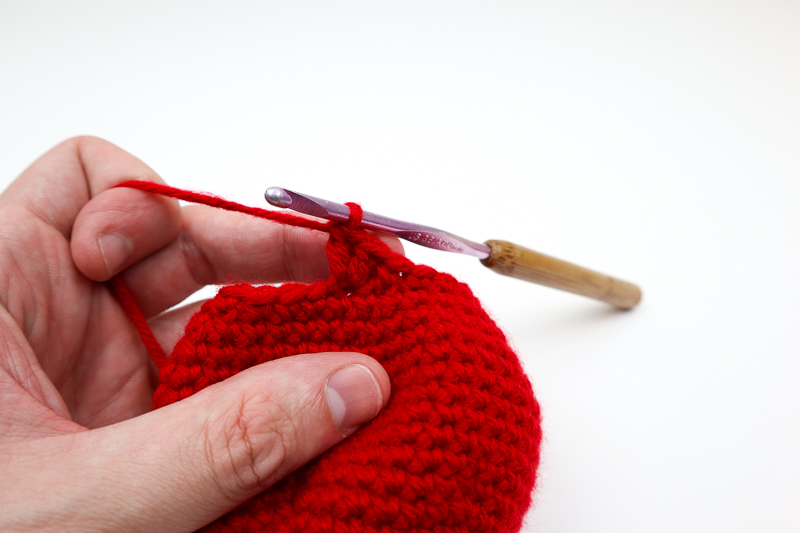
Into the next stitch, dc x 5into the same front loop! Down below is how it will look, you stitch will be stressed so do you best with tension!
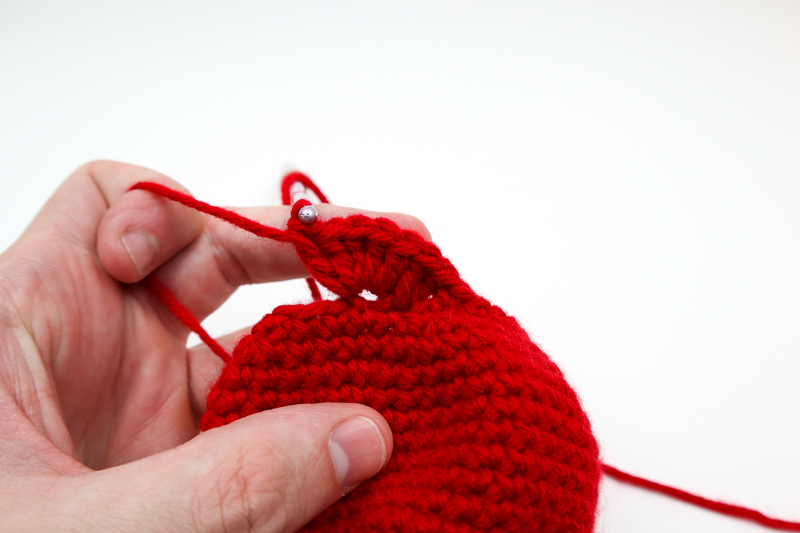
Continue the repetition of *Dc x 2 into first stitch, dc x 5 into the following stitch* Your work will begin to look wavy as seen down below
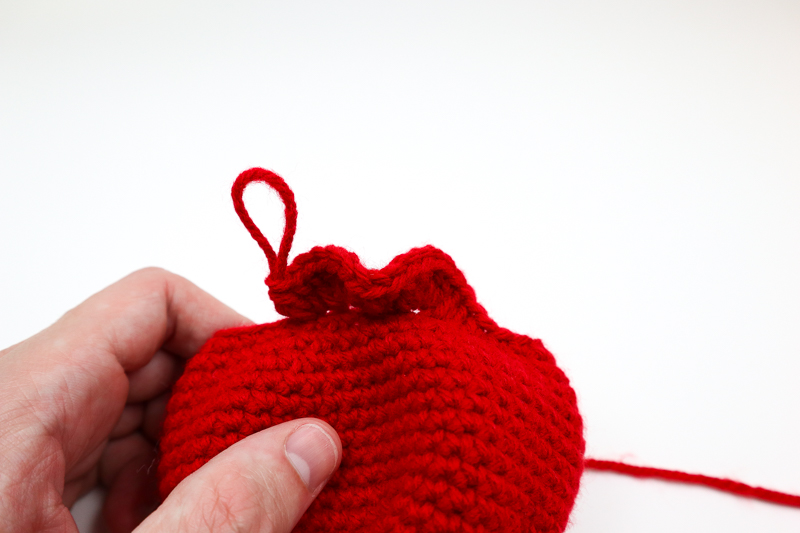
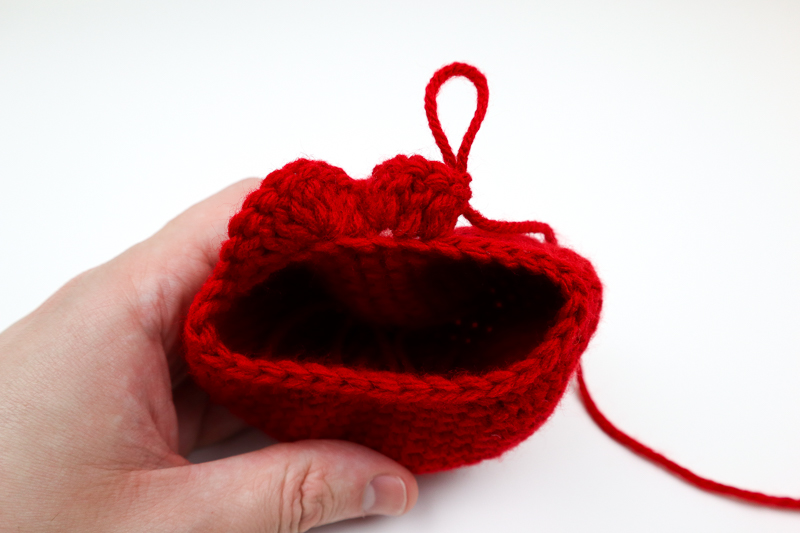
Finish off
Insert safety eyes into Rnd 13 with 9 stitches apart.
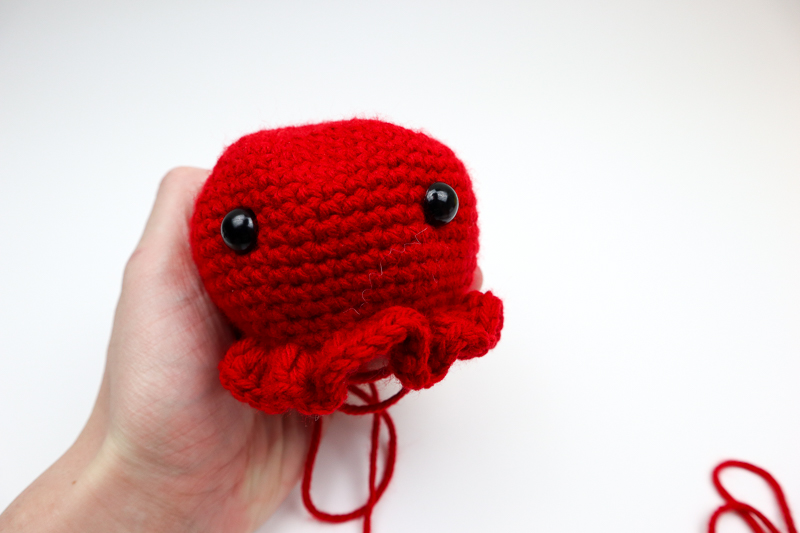
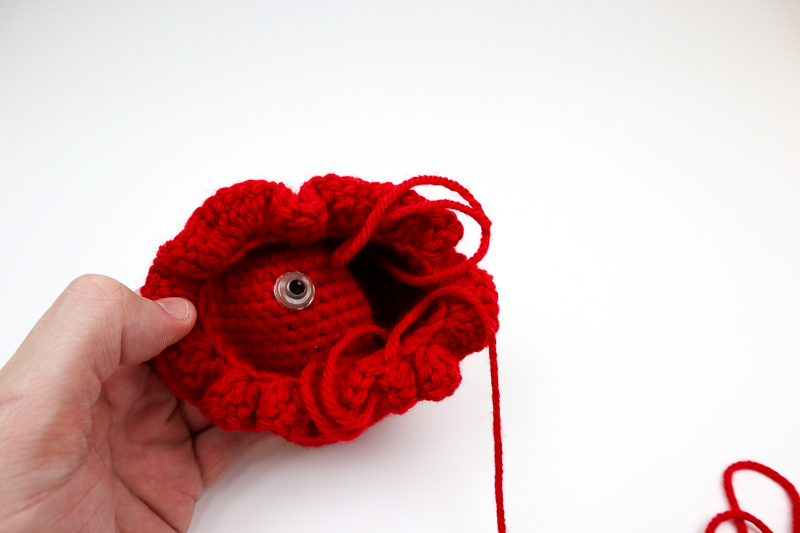
Bottom / Base
Begin in camel
Rnd 1: 6 Single crochet into Magic Ring (6)
Rnd 2: *Inc* around (12)
Rnd 3: *Sc, Inc* around (18)
Rnd 4: *Sc 2, Inc* around (24)
Rnd 5: In FLO, Sc around (24)
Rnd 6: Dc in each stitch around (24)
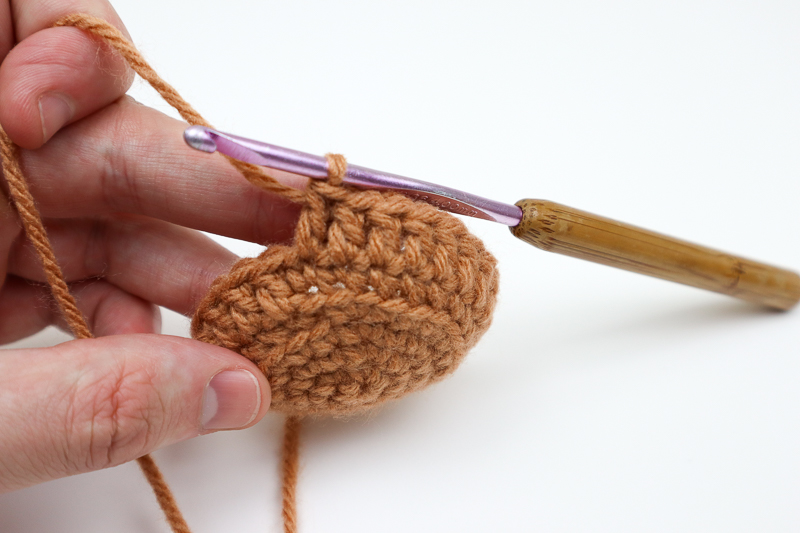
Rnd 7: *Dc in first 2 stitches, Dc into the front post. Repeat from* Photo tutorial below (24)
After the first two dc, you will do another dc into the front post of the next stitch – instead of going into your typical stitch, you will go underneath where the vertical stitch is and perform a double crochet.
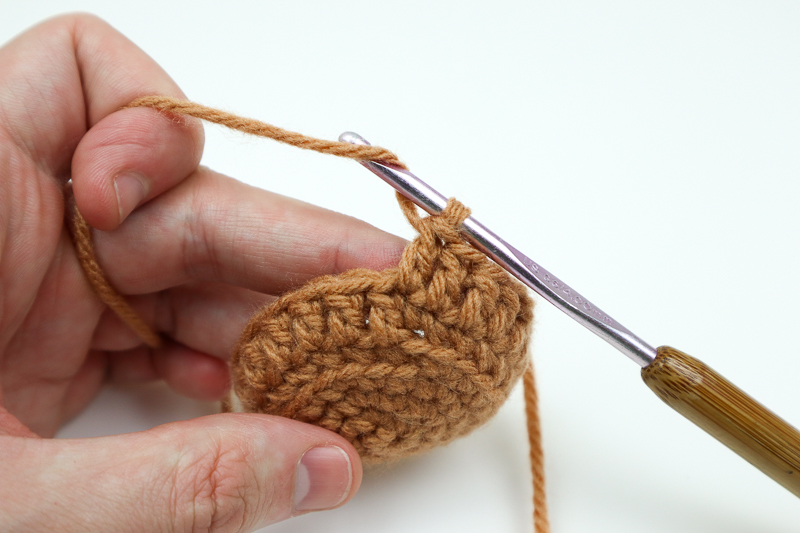
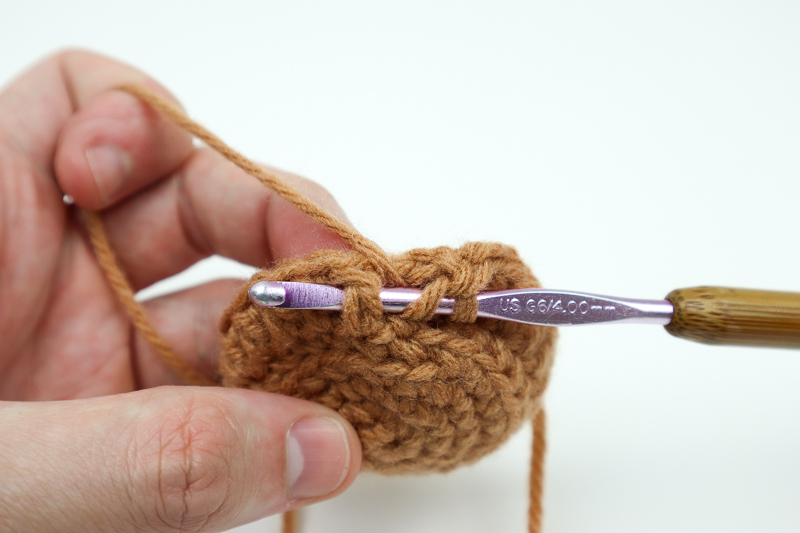
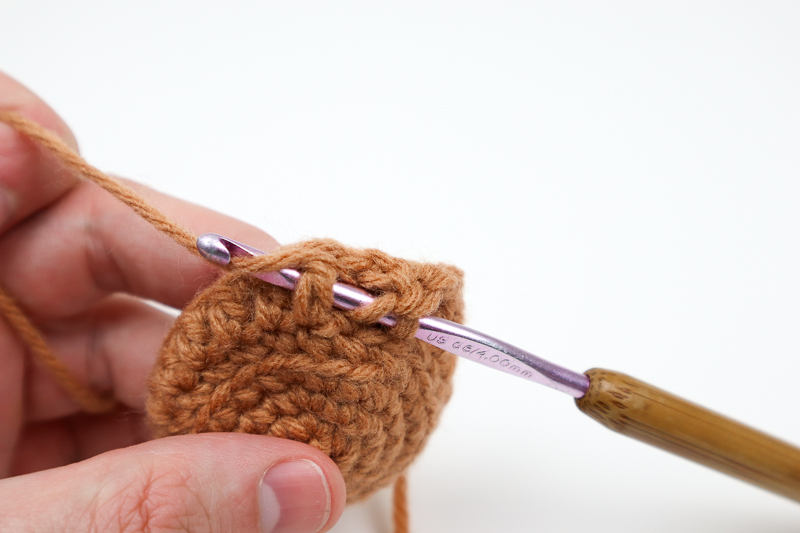
You should now have a double crochet that’s a bit more outward wrapped along the front post!

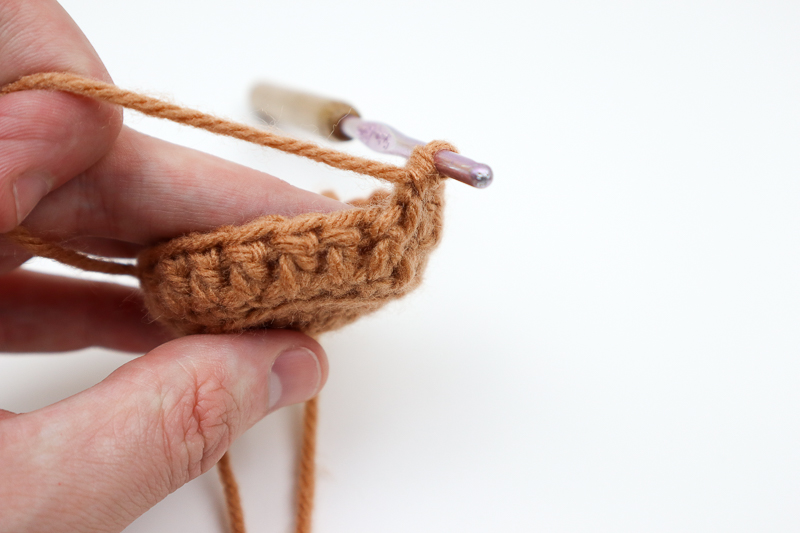
Continue following the pattern below (after the picture), double crocheting into the same front post around.
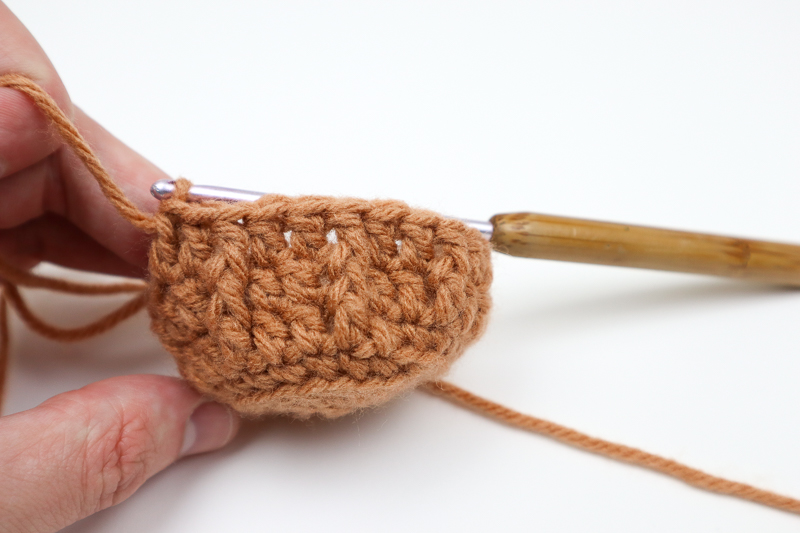
Rnd 8: *Dc in first 2 stitches, Dc into the front post. Repeat from*
Rnd 9: *Dc in first 2 stitches, Dc into the front post. Repeat from*
Rnd 10: *Dc in first 2 stitches, Dc into the front post. Repeat from*
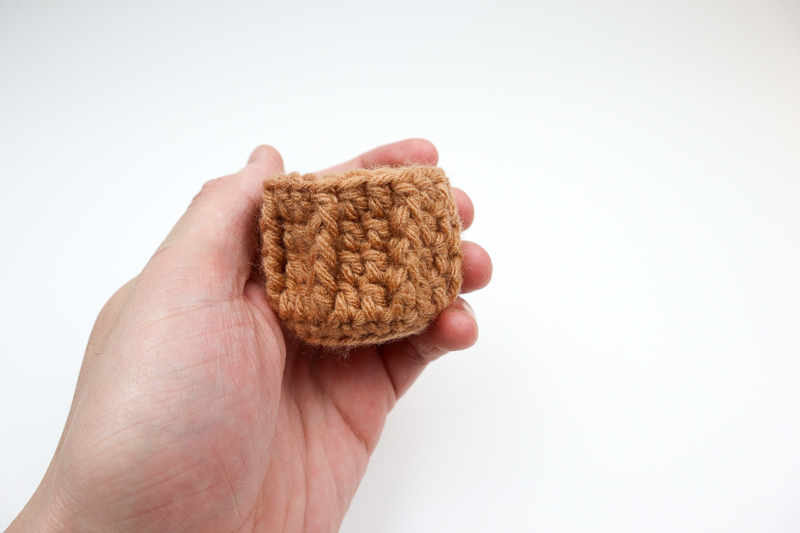
Finish off and leave tail for sewing.
Here is how it will look at the end!
Strawberry leaf
Begin in Green
Rnd 1: 6 Single crochet into Magic Ring (6)
Rnd 2 – 4: Sc around (6)

We will now do the 6 leaves
Rnd 5: (This step will be written out completely – down below will be the photo tutorial involving these steps) Sc into the first stitch. *Ch 5, Sl st into the first stitch of the chain. Followed by a sc, hdc, and Dc. Dc into the first stitch, With all 6 new stitches on the chain, single crochet into the following stitch. Repeat from * around.
Photo tutorial
Ch 5
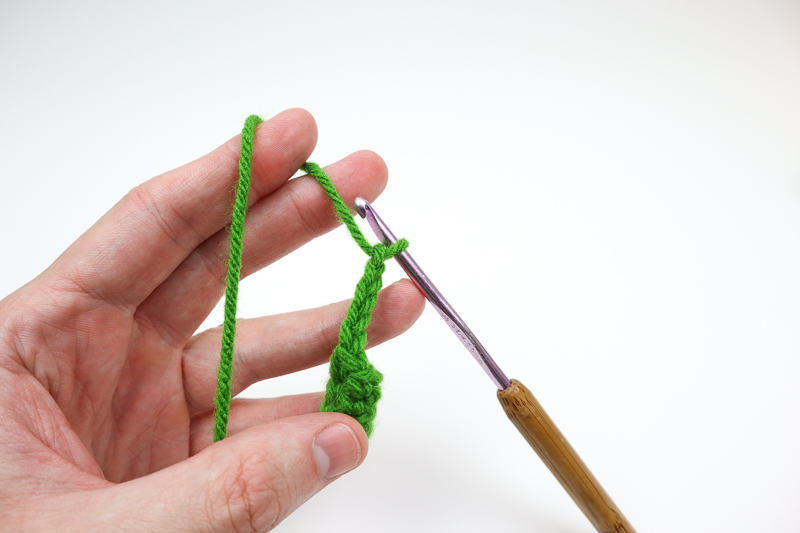
Sl st into the first stitch of the chain.
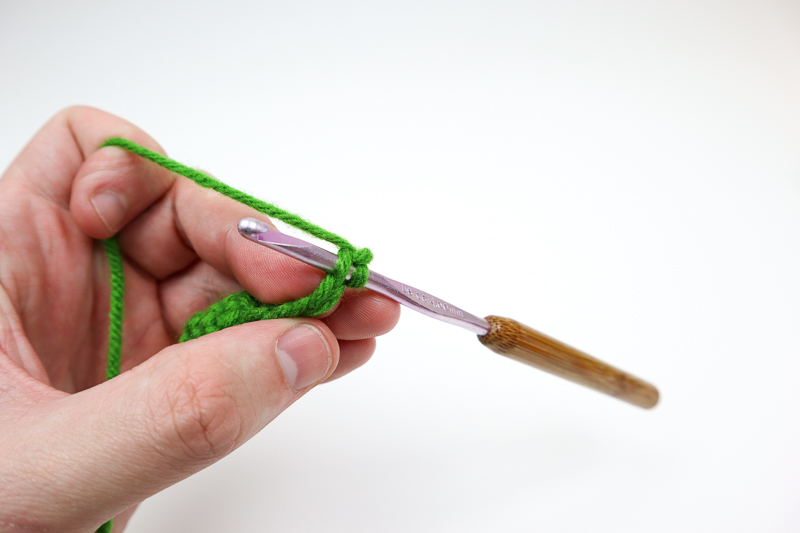
Followed by a sc, hdc, and dc.
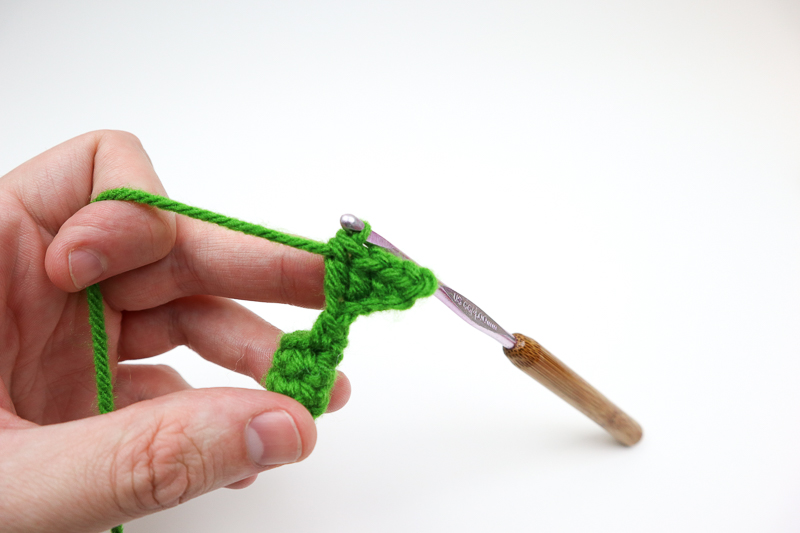
Dc into the first [sc] stitch that you started in at the beginning oft he round.
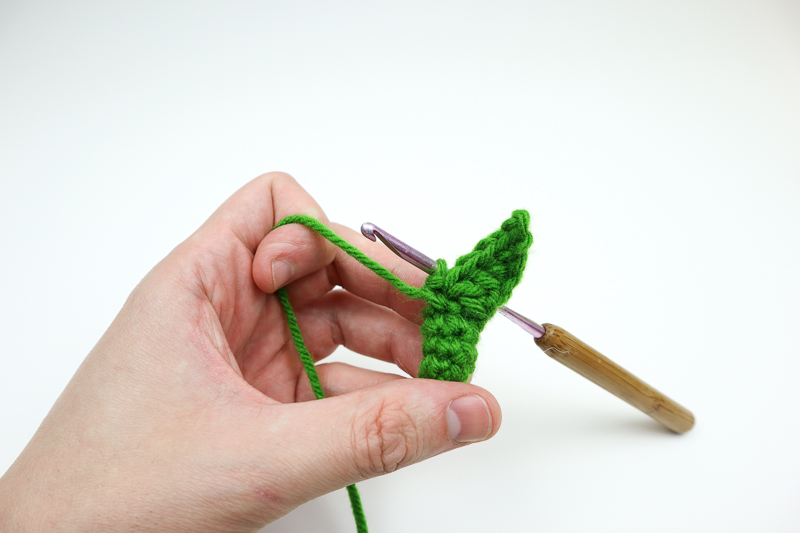
With all 6 new stitches on the chain, single crochet into the following stitch. ch 5.
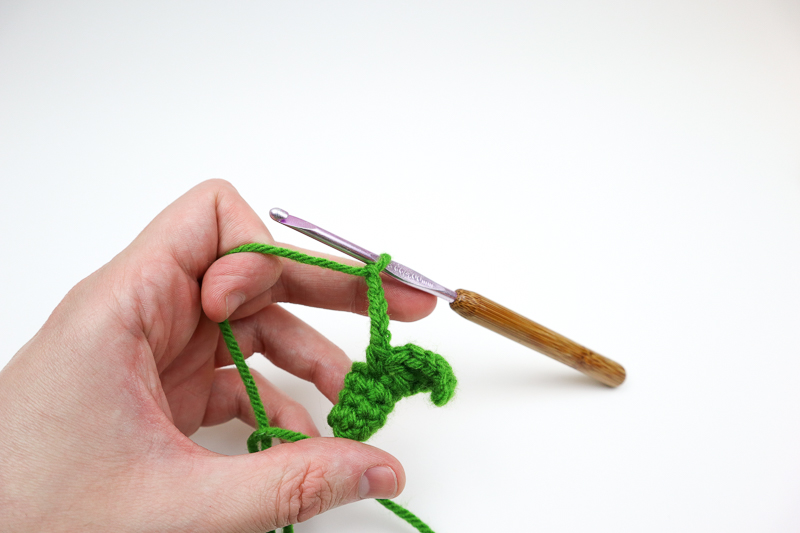
Continue these same steps all the way around!

Coconut Helmet
Rnd 1: 6 Single crochet into Magic Ring (6) (Click here for video tutorial!)
Rnd 2: *Inc* around (12)
Rnd 3: *Sc, Inc* around (18)
Rnd 4: *Sc 2, Inc* around (24)
Rnd 5: *Sc 3, Inc* around (30)
Rnd 6: *Sc 4, Inc* around (36)
Rnd 7: *Sc 5, Inc* around (42)
Rnd 8 – 12: Sc around (42)
Slip stitch into next stitch. Finish off and leave tail for sewing
Coconut leaf
Ch 6
Sl st into first stitch. Sc into next stitch, hdc into the following, dc into next. Into the last stitch, dc x 8 into the same stitch (your work will begin to turn). Dc into first stitch, hdc into next stitch, followed by a single crochet. Sl st into final stitch (corner)
Assembly
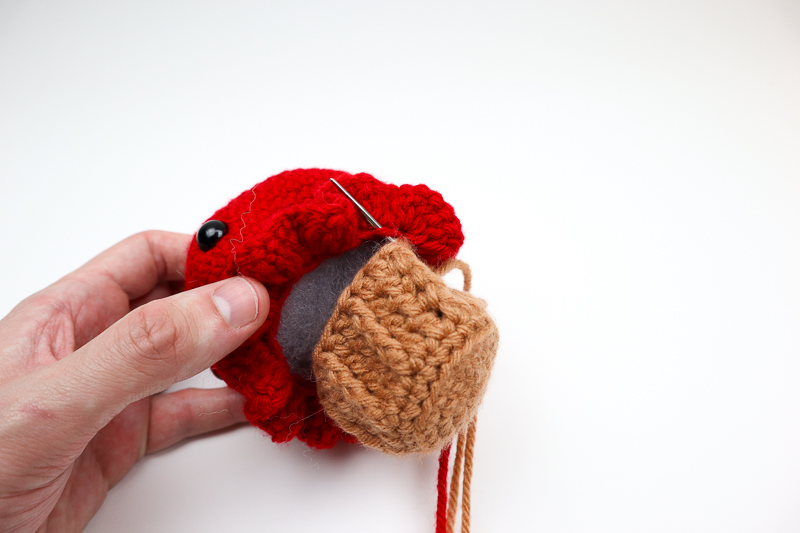
To begin (with either tart you decided to make) we will be sewing on the base to the top / main body of your project.
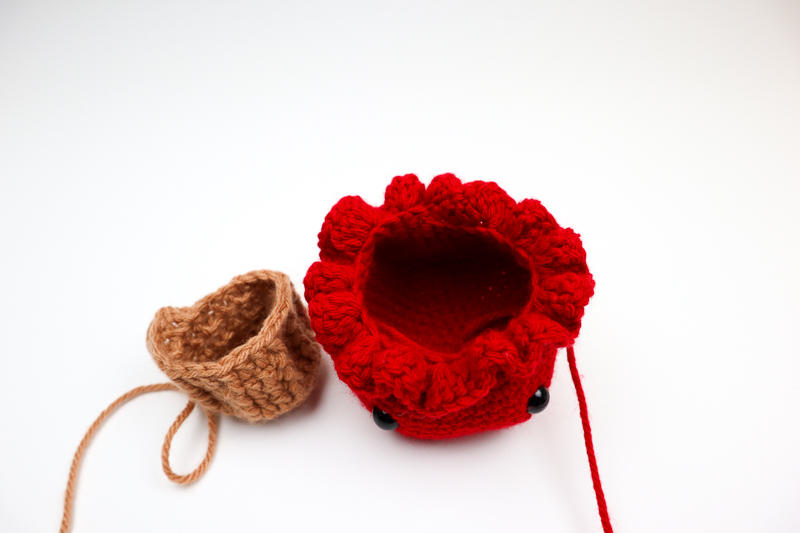
With your darning needle from the base, insert your needle into the first stitch of the Back loops that were left when creating your ruffles.
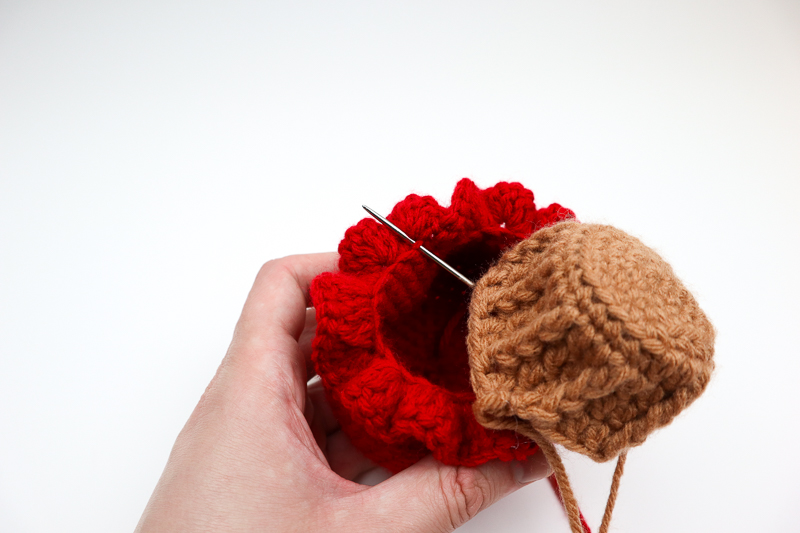
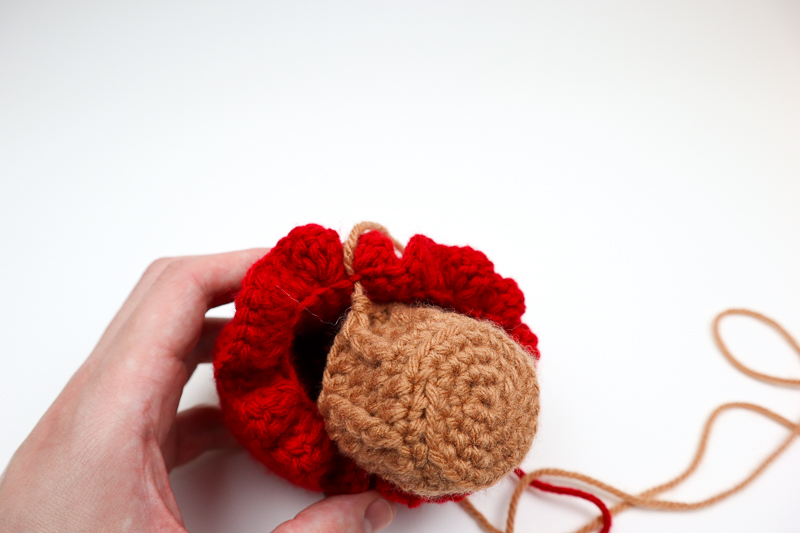
With you needle, go down into the next loop and the next stitch of the stitch of the base. (This will be the second stitch)
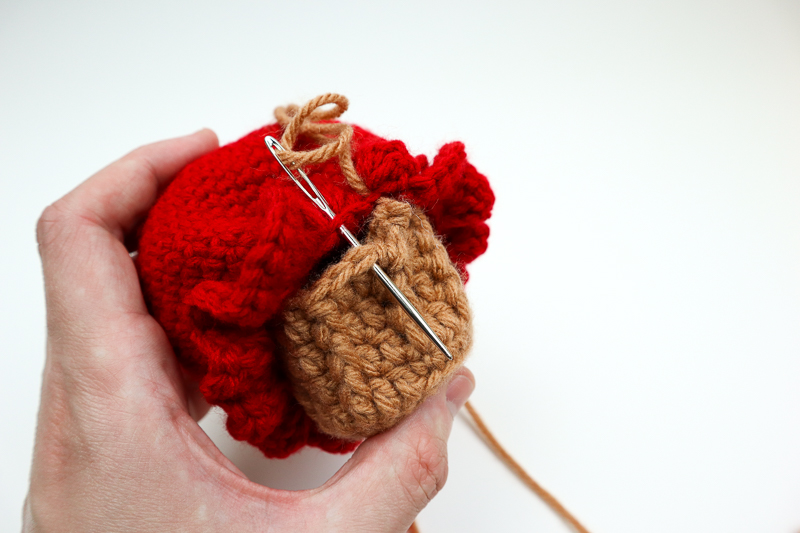
Continue seaming for the next 5 stitches
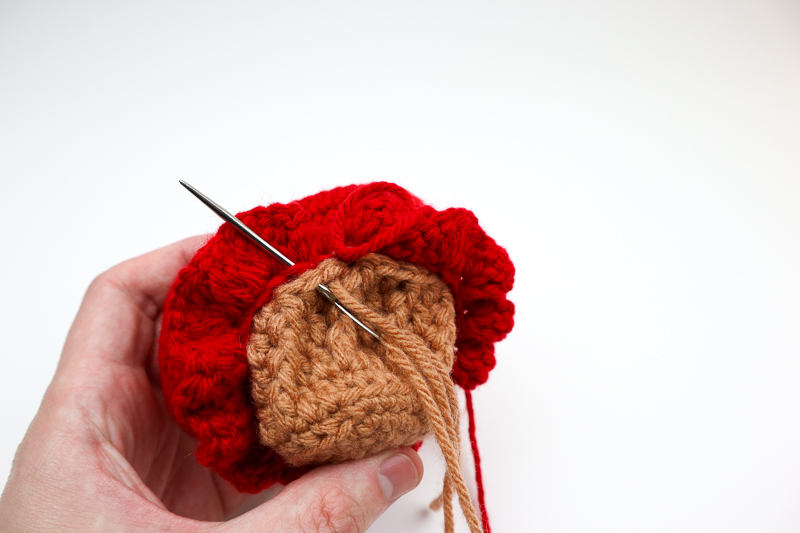
When you have reached your 6th stitch, insert your needle into the same stitch from before instead of entering through the next stitch as you were planning.
(The reason for this is to fix the math. The top of your tart has 30 stitches and the base only has 24. This should align your numbers!)
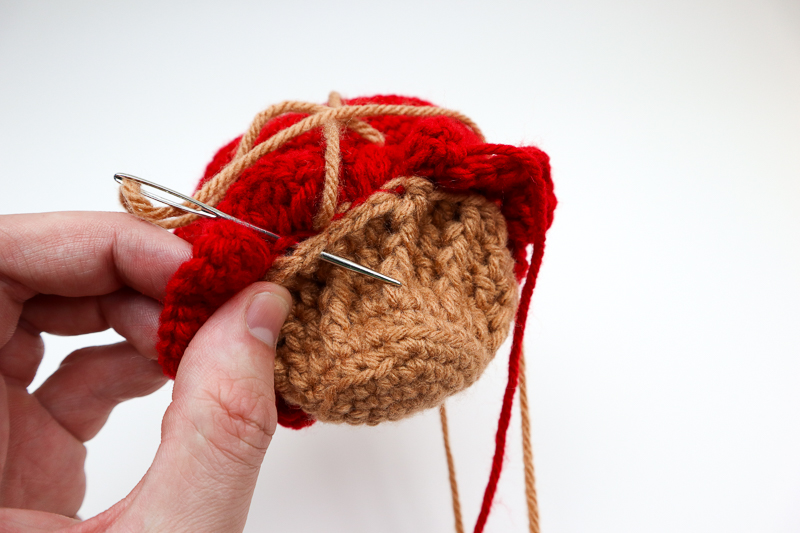
As you continue to sew around, begin to stuff your work! You will add your polyfill into both the base and the body/head
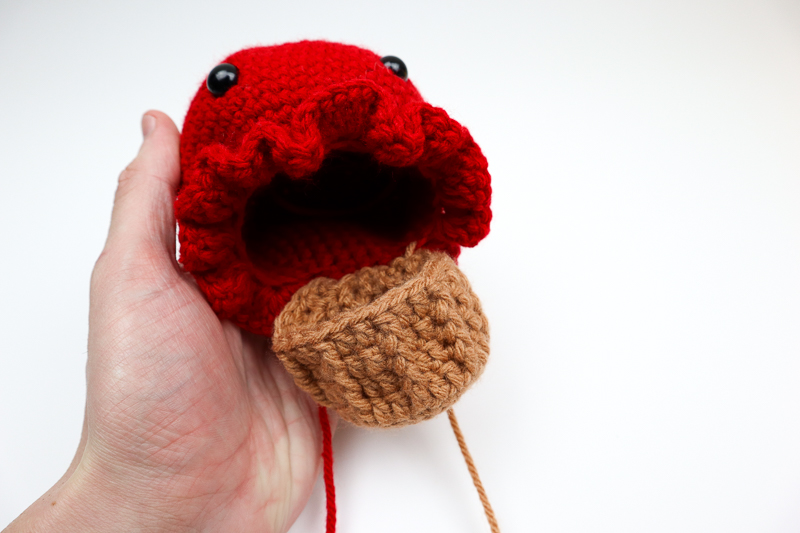
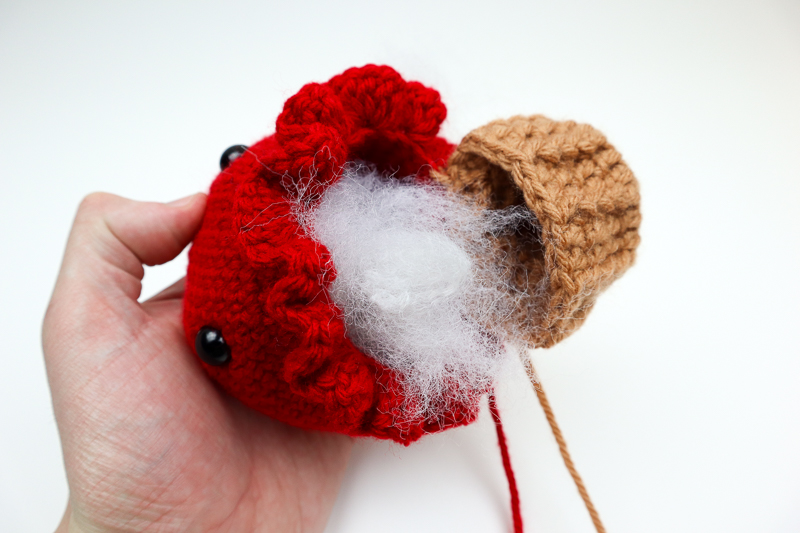
When stuffing into the base/bottom, be sure not to stuff too firmly to the point of the stuffing coming out of the stitches! You will want to find a happy medium on how firm it is. Feel free to experiment.
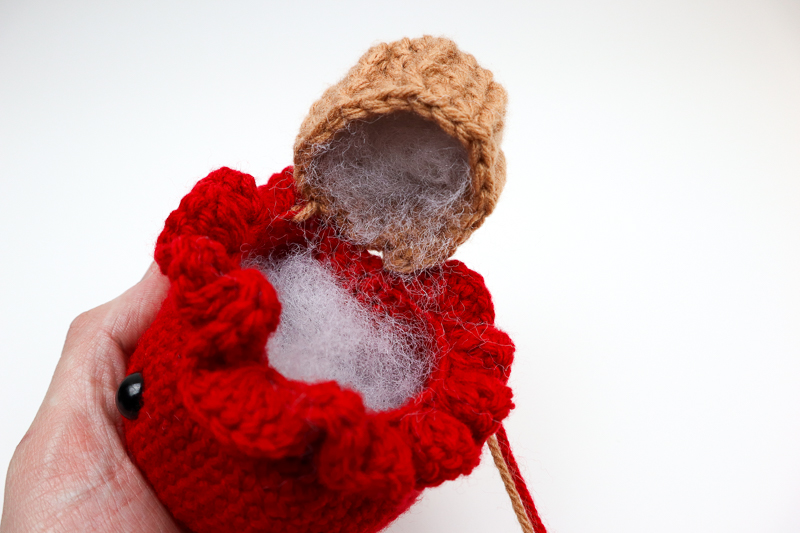
Continue sewing around and stuffing your project as you go.
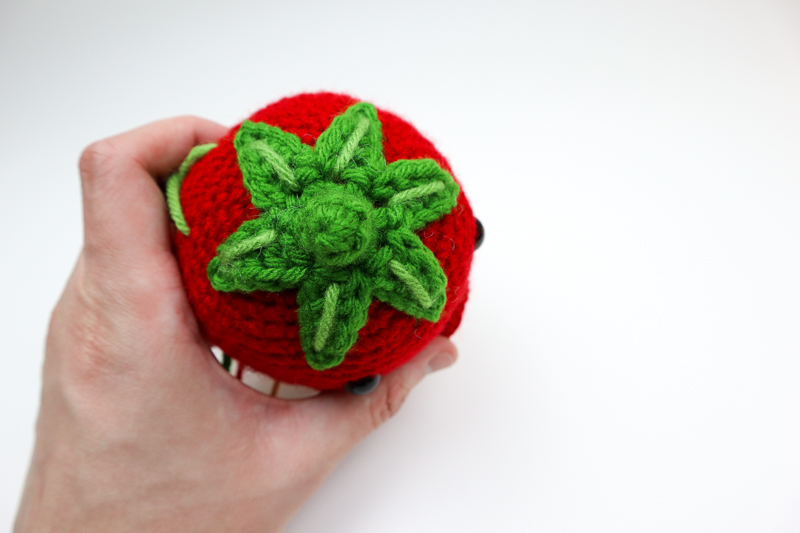
Assembling the top leaf
Place the leaves on top of your strawberry in your desired location
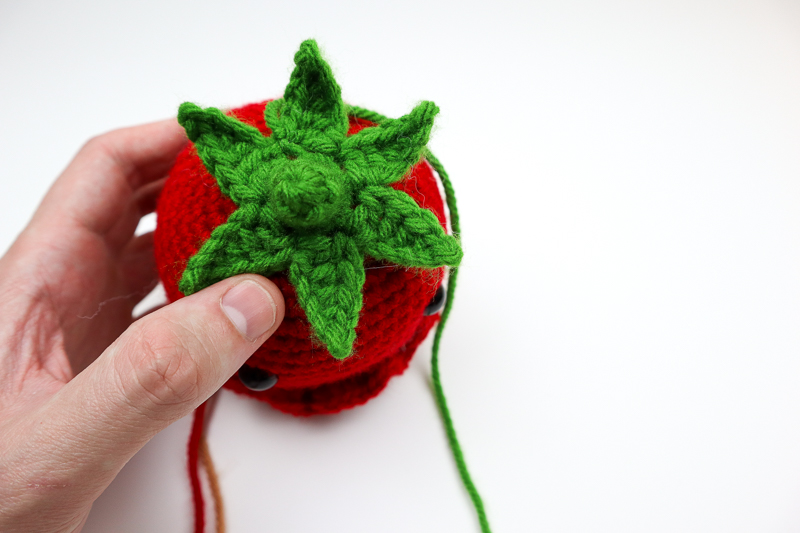
With your darning needle, insert the tail (green yarn) into the piece to secure.

Coming out, insert your needle through the round of stitches that the corner of the leaf sits on and pull through the corner of the leaf.
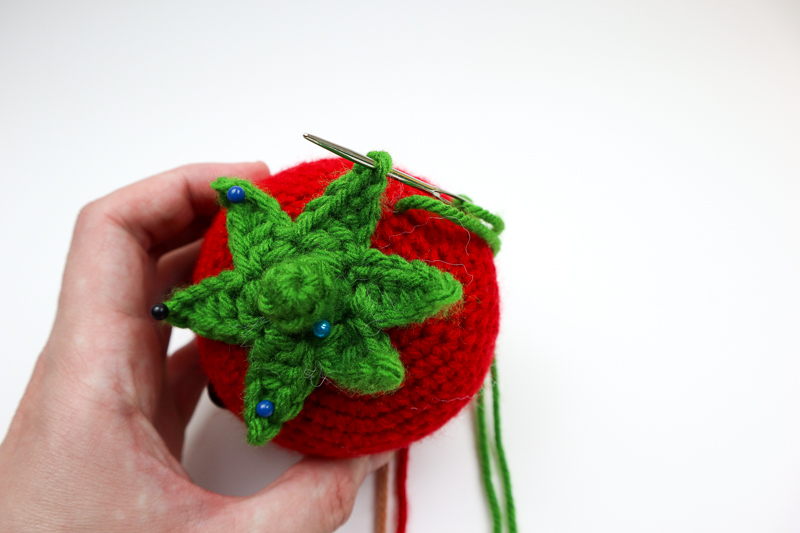
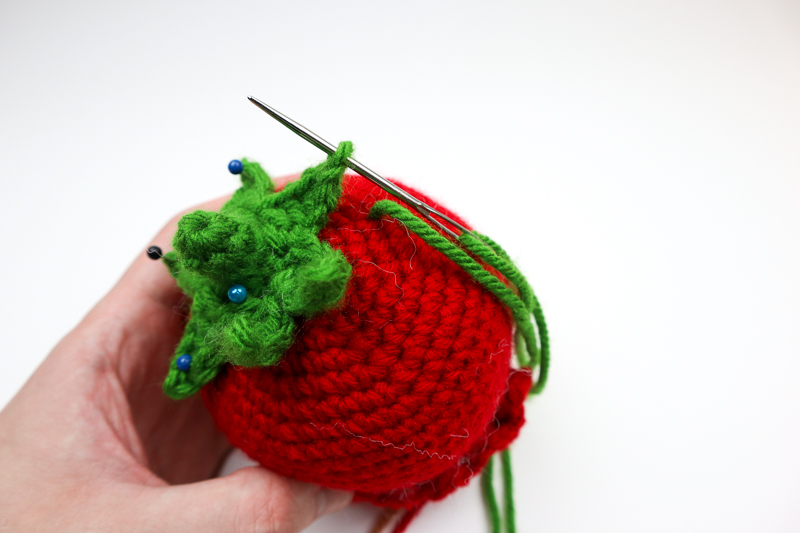
Insert you needle back through and come out the next round of stitches where the next corner of the leaf is.
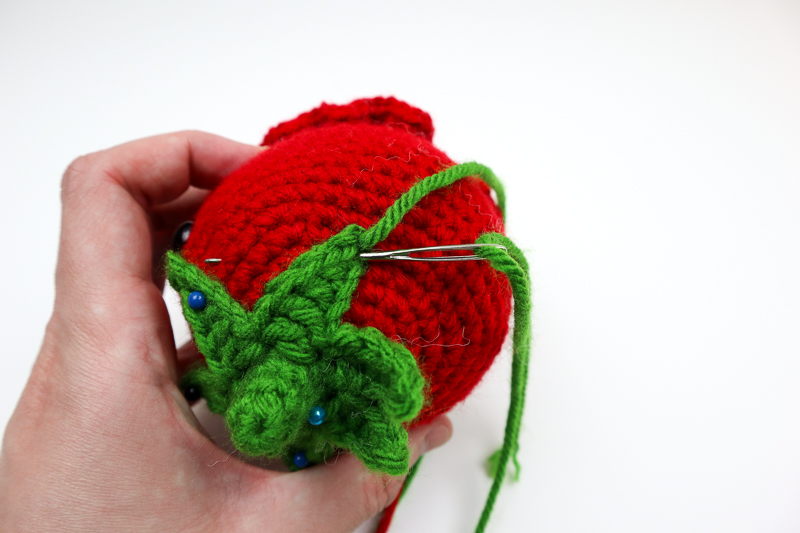
As you can see, the leaf lays flat. You’re more than welcome to keep them up if you would like!
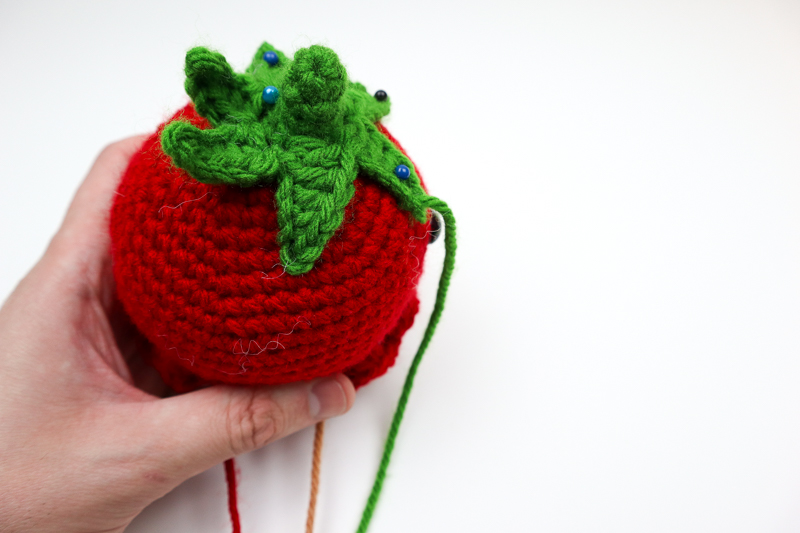
Continue this all the way around into each corner!
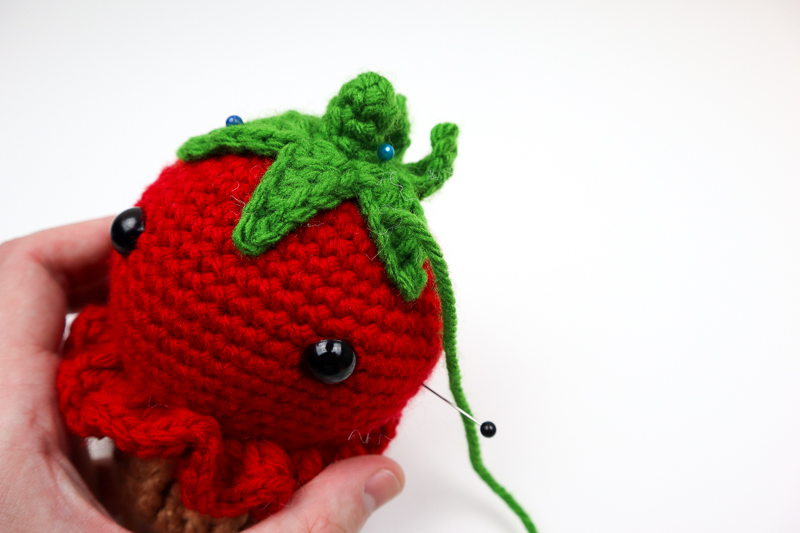
Knot off
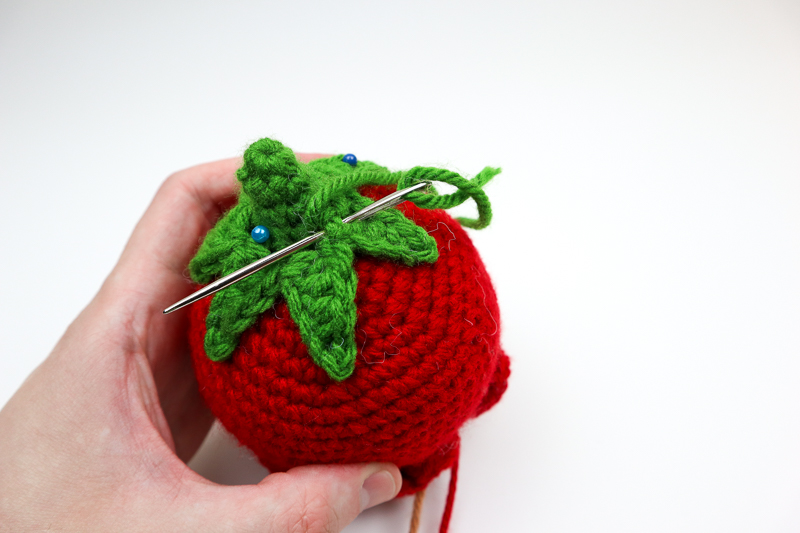
Time to add the details!
With your lighter green yarn, insert through the leaf at the base. Pull through to the corner of the leaf.
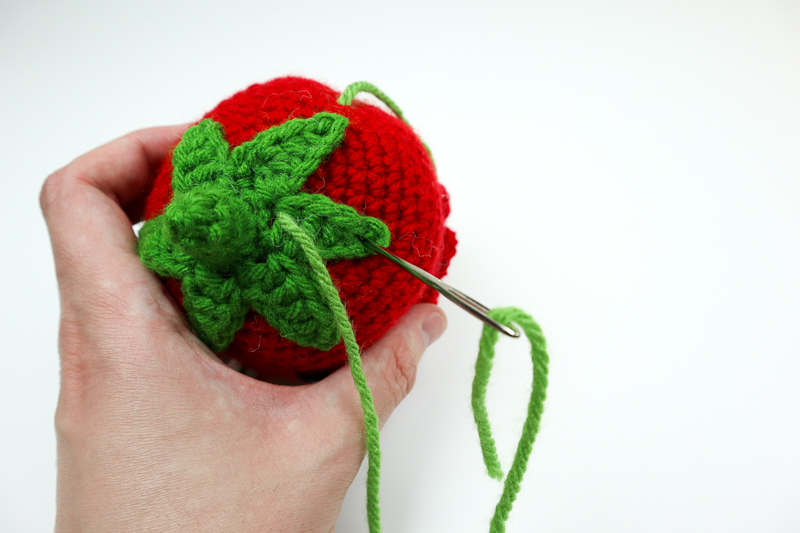
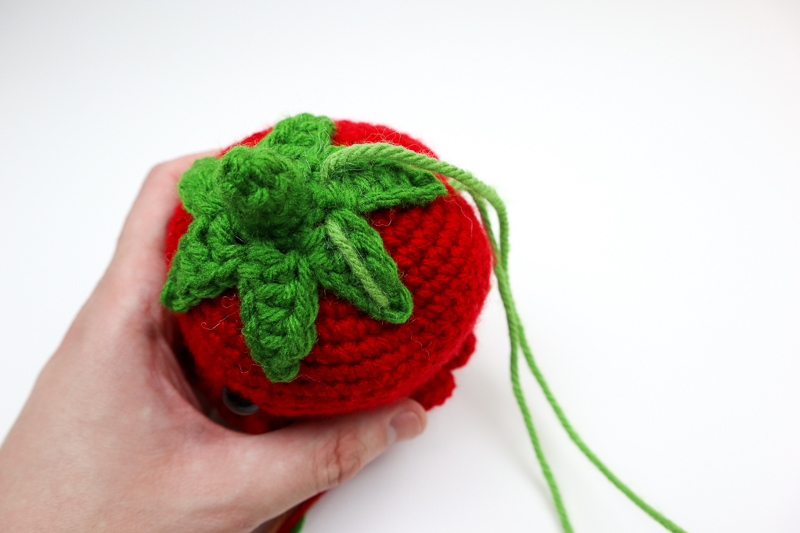
Continue doing this all the way around
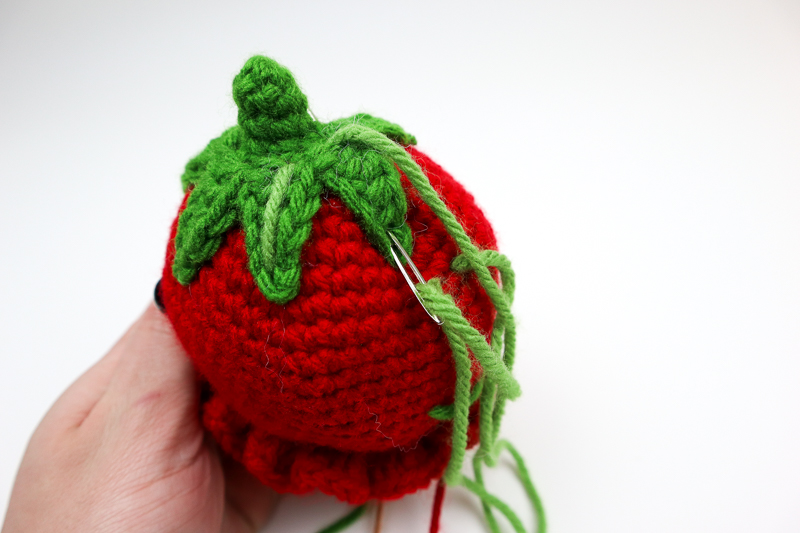
And here is how it will all look!
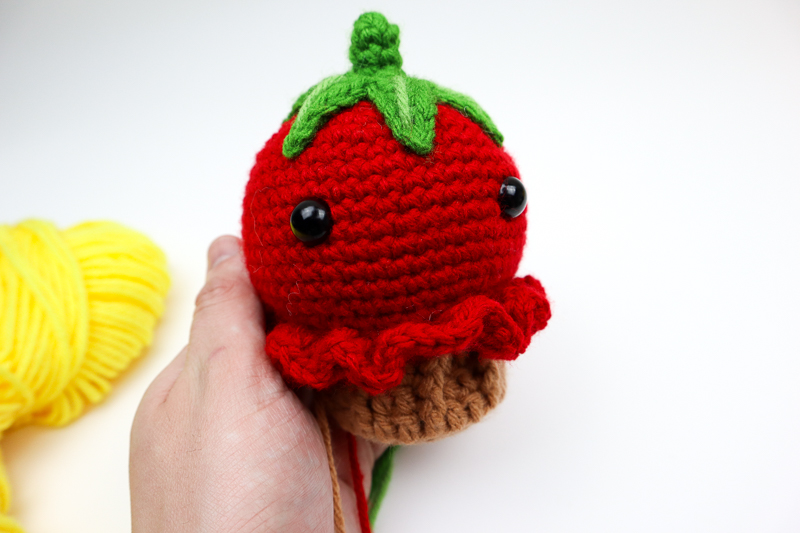
Seed detail
With your yellow yarn, insert your needle through the side of your work and pull down just once stitch
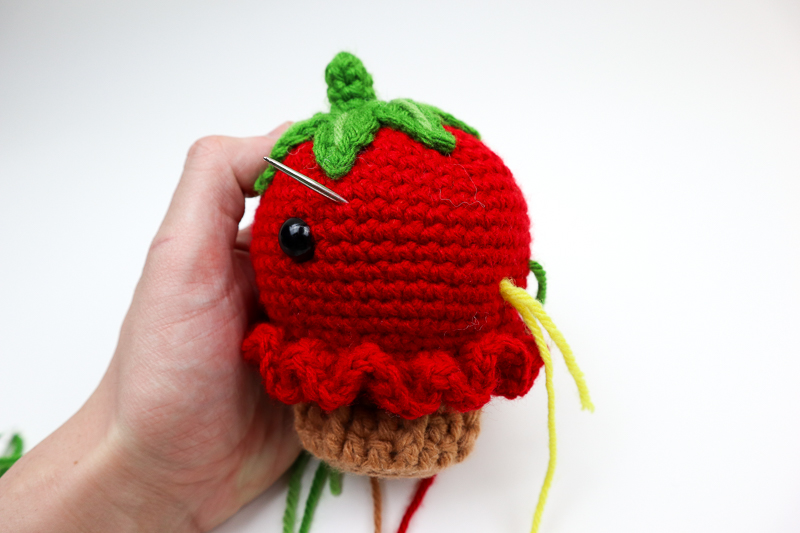

Pull through to create all the seeds in any pattern you would like!
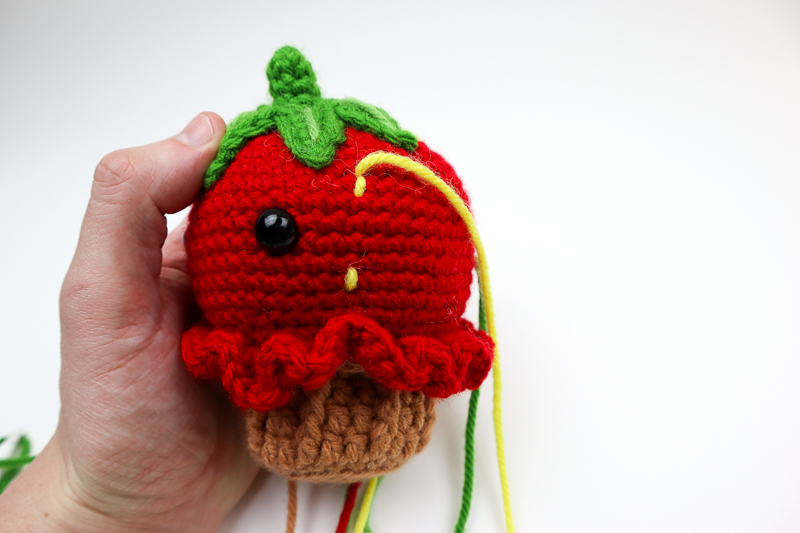
(Optional) For each seed, pull the yarn back through to give it a second layer. I personally like this look!
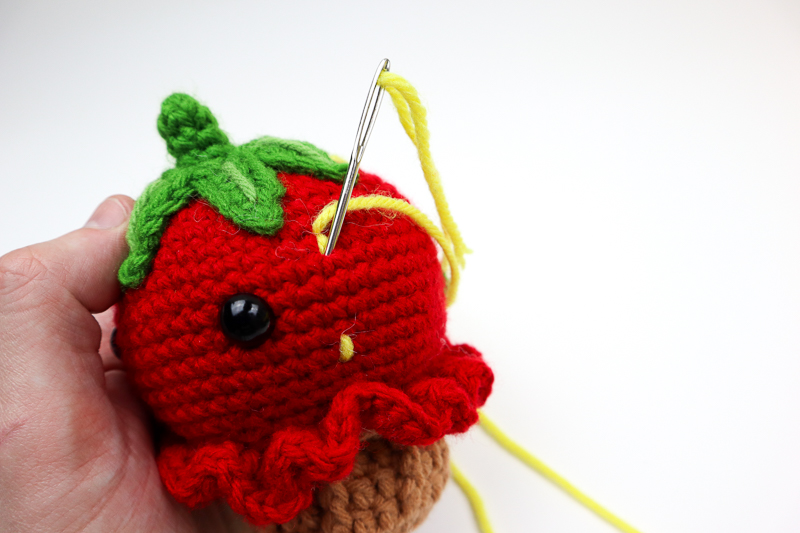
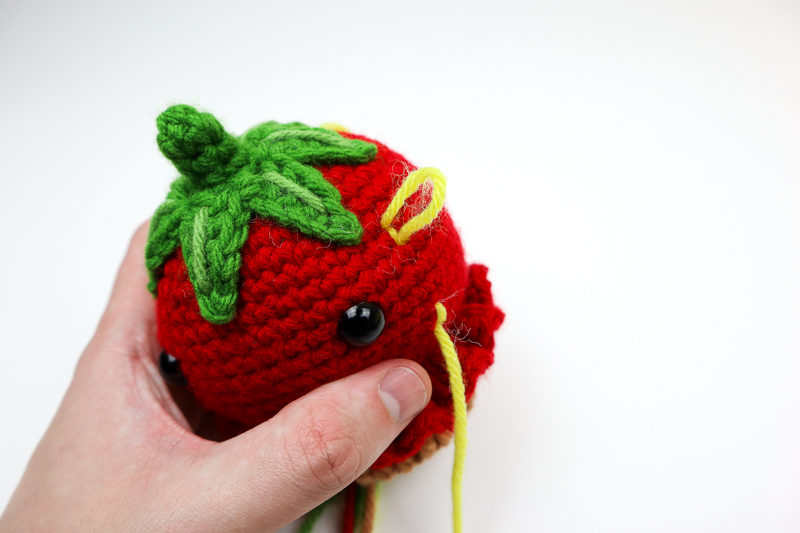
Before we get too far and the seeds start to enter the front of our doll, lets add on our face!
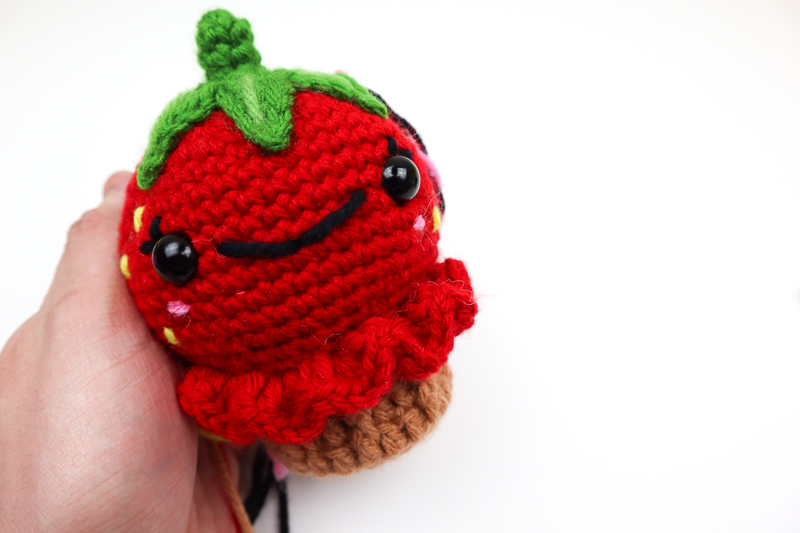
Once your face is looking cute, continue your embroidery with the seeds
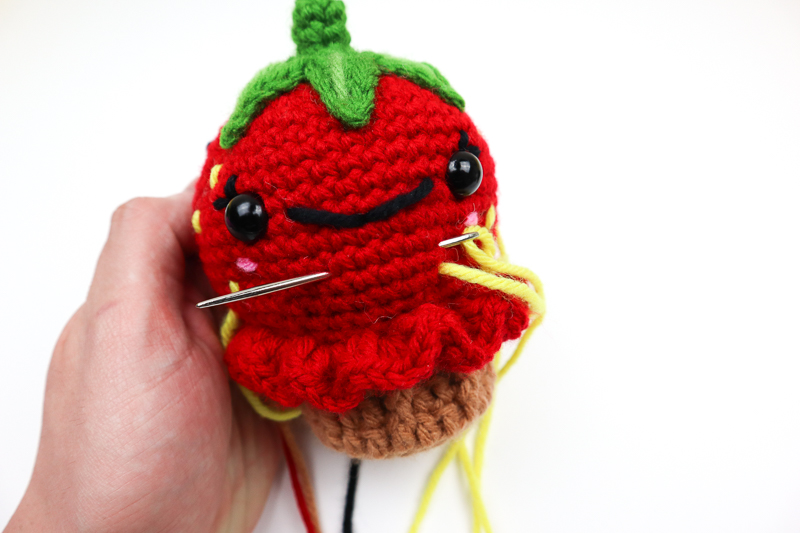
You’re all done!
All editorial content and projects are intellectual property of Vincent Green-Hite, designer of Knot Bad.
This post was sponsored by JOANN Stores but all ideas and opinions are my own. Please do not claim this pattern as your own. If you wish to share this pattern, you may link to this pattern but please do not reprint it on your site. You may keep a copy for your own personal use but please DO NOT sell the pattern or distribute it.
You may sell products made from this pattern but please clearly credit the design to Knot Bad and link it my website knotbadami.com Make sure to post it! Use the hashtag #yarnpunk and #handmadewithjoann when posting it and please feel free to tag me and show me how yours turned out! You can also find the Facebook group and subreddit r/yarnpunk to post to as well!


