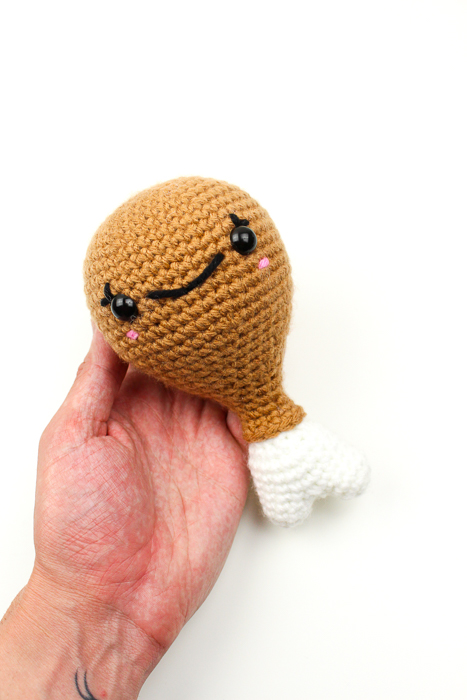
This post was sponsored by JOANN – My favorite craft store to visit for all my yarn and tools that I use. Also, you can’t resist all their coupons!
Happy Friendsgiving!
We are going to ignore Thanksgiving this year for a number of reasons and we’re going to really put more of a focus on Friendsgiving! This time of year during the holidays, especially November, there seems to be more and more emphasis on being grateful. Especially with what feels like the world ending in some ways, keeping our loved close feels really important. At least, that’s how I am feeling.
I think that it is a great thing to be intentional about being grateful for what we have in our lives and I am glad the conversation continues! One important thing for us to be very grateful about is our relationships. I know I have so many in my life that I cherish and it’s a good reminder to cultivate those existing ones that are closest to our hearts. One way to show our gratefulness to our loved ones is sharing – and there’s nothing more intimate that food!
With my newest project from JOANN, I wanted to create a fun food amigurumi that is a classic to pass around and share with everyone – chicken legs! Or I guess for the occasion, it can also be a turkey leg. Most holidays center us around the table and passing food around to enjoy and I think this cute project could be the cherry on top of the meal.
How will you be showing your loved ones your gratefulness towards them? You can think about that when you head over to JOANN to get all the materials for this really fun project! Down below, you can find the free pattern!
All editorial content and projects are intellectual property of Vincent Green-Hite, designer of Knot Bad.
This post was sponsored by JOANN Stores but all ideas and opinions are my own. Please do not claim this pattern as your own. If you wish to share this pattern, you may link to this pattern but please do not reprint it on your site. You may keep a copy for your own personal use but please DO NOT sell the pattern or distribute it.
You may sell products made from this pattern but please clearly credit the design to Knot Bad and link it my website knotbadami.com Make sure to post it! Use the hashtag #yarnpunk and #handmadewithjoann when posting it and please feel free to tag me and show me how yours turned out! You can also find the Facebook group and subreddit r/yarnpunk to post to as well!

So here’s what you’ll need:
All the yarns can be substituted with any worsted weight yarn (size 4)*
1 Skein in JOANN Big Twist (in Black)
1 Skein in JOANN Big Twist (in White)
1 Skein in JOANN Big Twist (in Camel)
1 Skein in JOANN Big Twist (in Camel)
1 Skein in JOANN Big Twist (in Medium Rose)
Dimensions
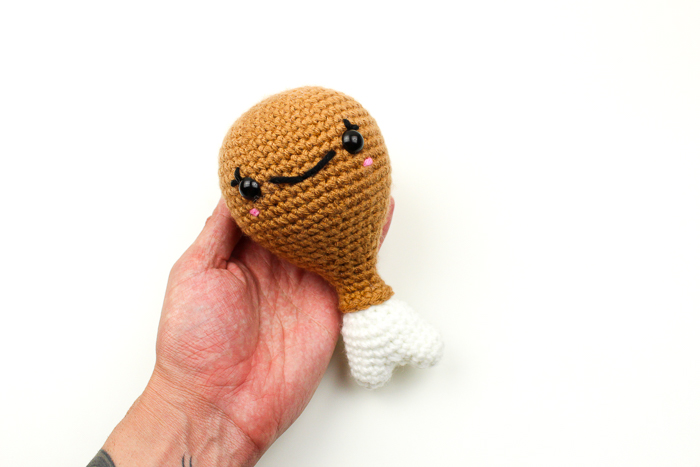
Height: 6″ inches roughly
Width: 3.5″ inches roughly
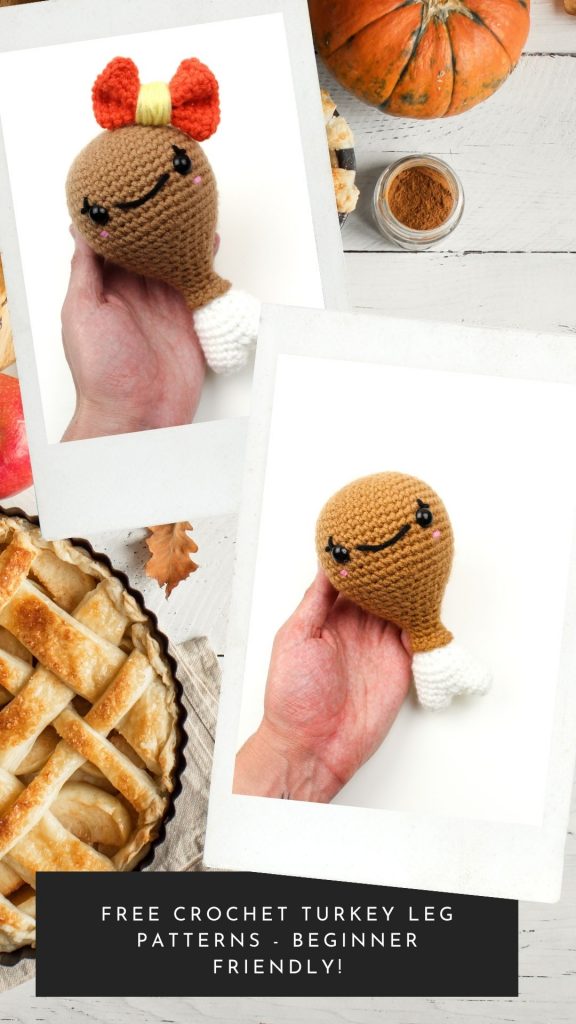
Don’t forget to pin this pattern for later! It can be easy to forget so make sure you have this tucked away for a rainy day on your Pinterest Boards!
Skill Level:
Easy
Abbreviations (In US terms)
Sl st – Slip StitchCh – chain
Sc – Single Crochet
Inc – Increase
Dec – Decrease
FLO – Front Loop Only
* *- Repeat
FO – Finish Off

Notes:
- This pattern is worked continuously in the round
- This pattern is written in US terms
- You can find helpful tutorials throughout, but if you would like to find some of my tips and tricks you can head HERE!
- The photo for each step will be found BELOW said step.
- Find my YouTube tutorial for the Magic Ring here!
Let’s Get Started!
Main Body
(Begin in Camel)
Rnd 1: 6 Single crochet into Magic Ring (6) (Click here for video tutorial!)
Rnd 2: *Inc* around (12)
Rnd 3: *Sc, Inc* around (18)
Rnd 4: *Sc 2, Inc* around (24)
Rnd 5: *Sc 3, Inc* around (30)
Rnd 6: *Sc 4, Inc* around (36)
Rnd 7: *Sc 5, Inc* around (42)
Rnd 8: *Sc 6, Inc* around (48)
Rnd 9 – 16: Sc around (48)
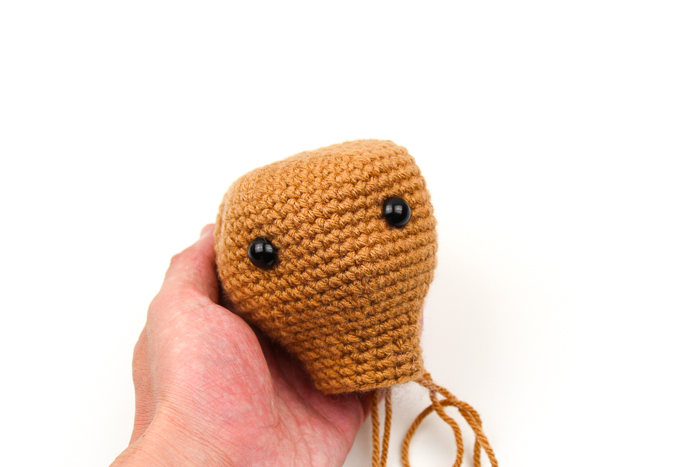
Counting downward from the Magic Ring, insert your safety eyes into Round 13 with 9 stitches apart. Stuff firmly!
Rnd 17: *Sc 6, Dec* around (42)
Rnd 18: *Sc 5, Dec* around (36)
Rnd 19: *Sc 4, Dec* around (30)
Rnd 20: Sc around (30)
Rnd 21: *Sc 3, Dec* around (24)
Be sure to be stuffing firmly!
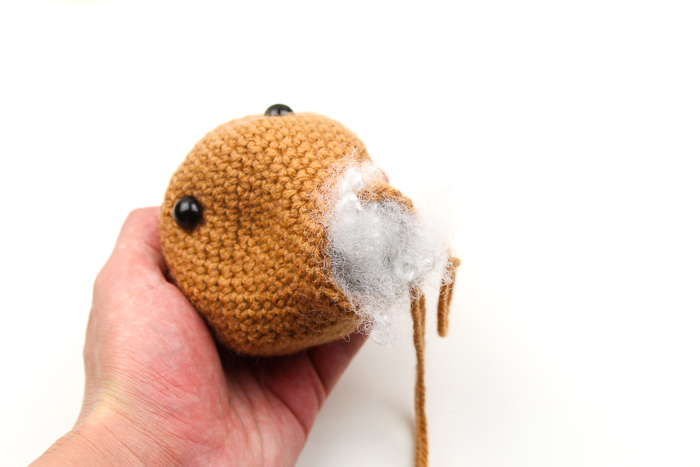
Rnd 22: Sc around (24)
Rnd 23: *Sc 2, Dec* around (18)
Rnd 24: Sc around (18)
Rnd 25: *Sc, Dec* around (12)
Rnd 26 – 27: Sc around (12)
Rnd 28: Sc in FLO
Rnd 29: Sc around. Do NOT finish off quite yet, we will be adding one more round of single crochet but it will be easier after we sew on the bone – let’s revisit this down below!
Bone: Creating the first “nub”
**This part of the pattern will be written with the actual round and then followed with an explanation. The photo for each step will be below the text!
Begin in White
Rnd 1: 6 Single crochet into Magic Ring (6) (Click here for video tutorial!)
Rnd 2: *Inc* around (12)
Rnd 3 – 5: Sc around (12)
Finish off.
Create one more from the steps but do NOT finish off. You will end up with two white pieces:

As you can tell, it’s a bit hard to show each step for this portion on how to attach, so I will be using pink for this tutorial! This is only to make it easier to see the stitches, your actual project will remain white!

With both of your pieces, make sure they are on the “incorrect” side (the tail should be facing outward) and line them up. Into the first circle that has not been finished off, insert your hook through:
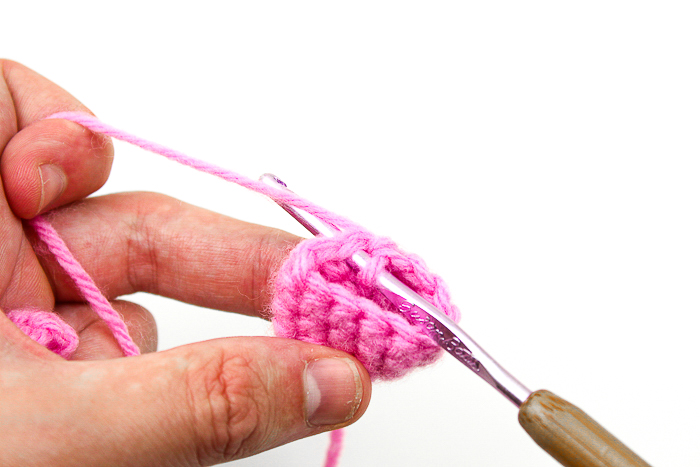
Lining up with your other circle, insert your hook through the top portion where the last stitch was, single crochet through both loops to join:

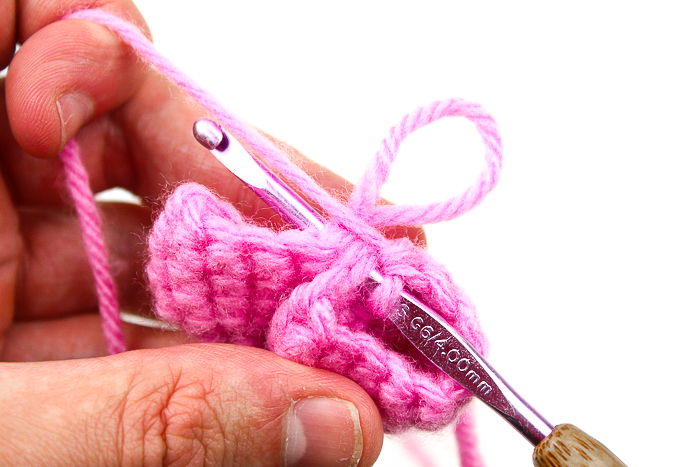
Insert your hook into the next stitch and do another single crochet:
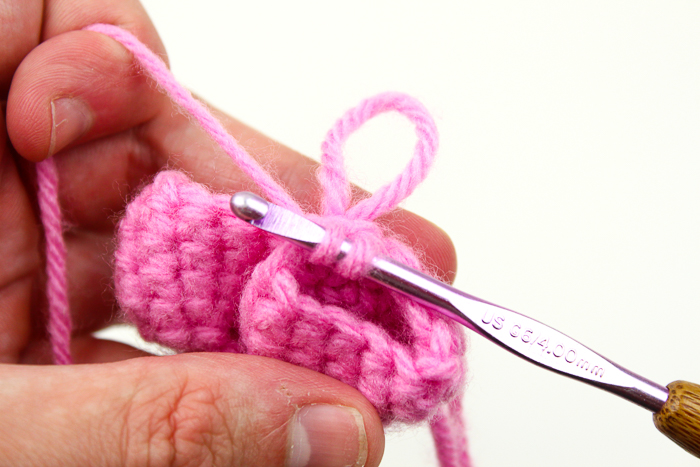
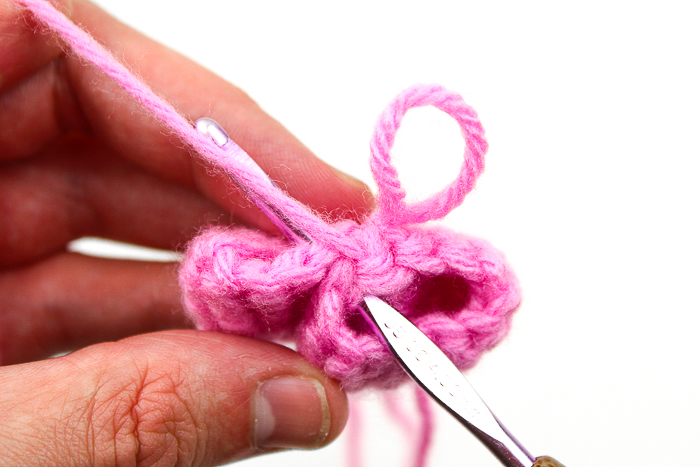
Perform this step 2 more times, ending a total of 4 single crochets. Down below is how it looks attached!
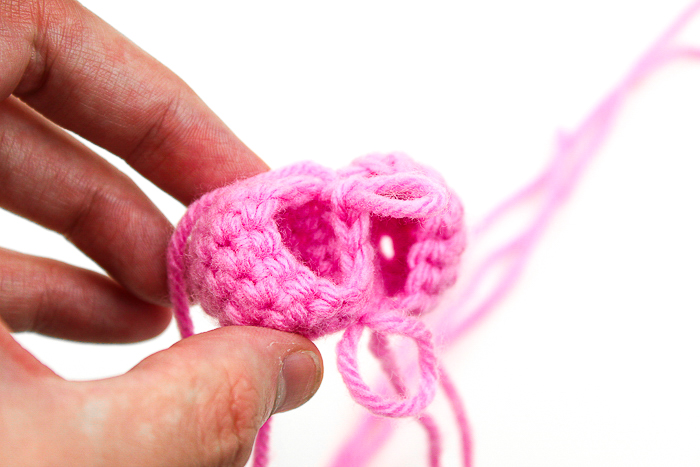
From here, single crochet along the round. From out last step of joining our work, sc into the next 8 stitches.
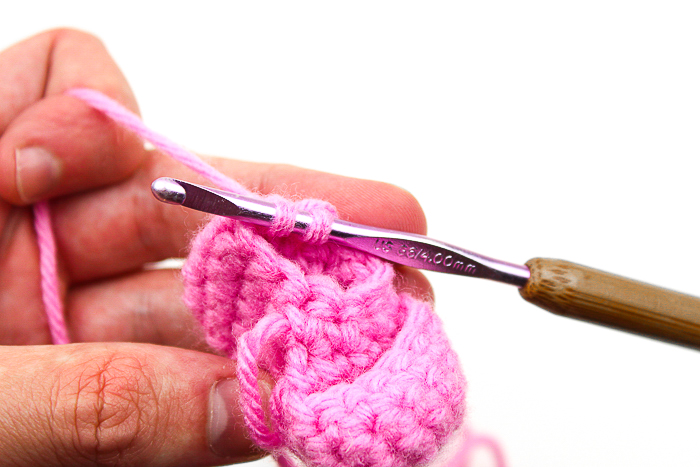
After your 8 sc’s, we are going to do a decrease into the stitch that’s still part of our round as well as the next stitch which is where you finished off from your joined circle.
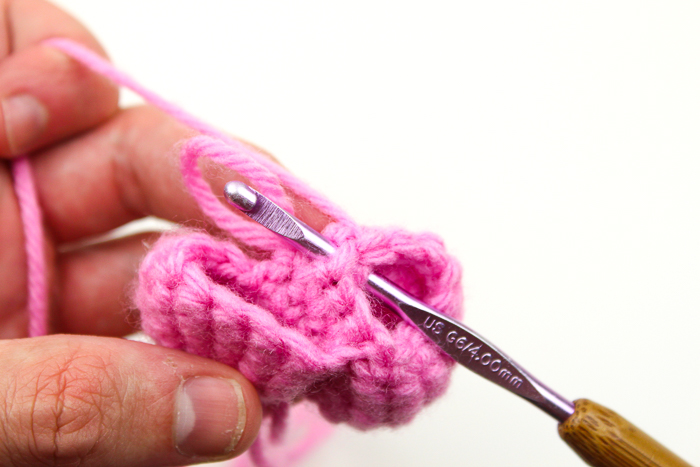
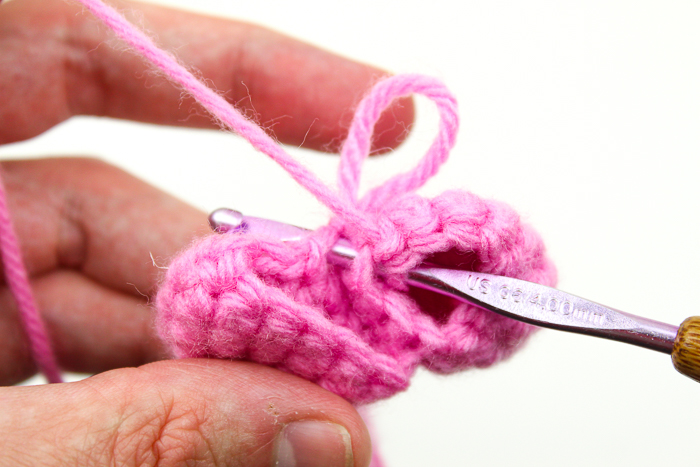
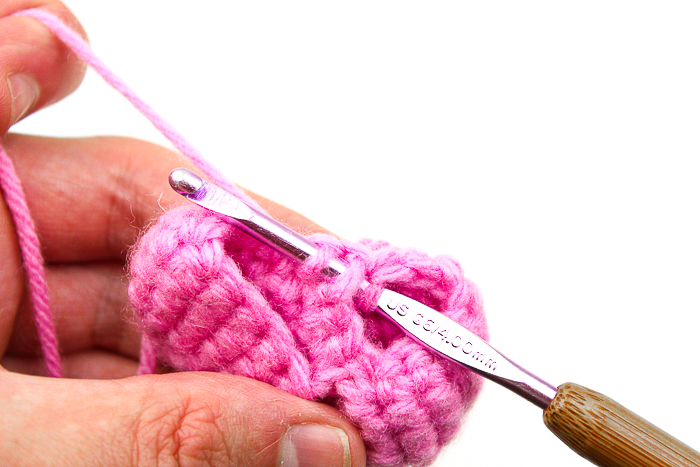
After your decrease, you will sc into the next 8 stitches around once again. Flip your work once you’ve done all 8 stitches!

Afterword, dec into the next 2 stitches.
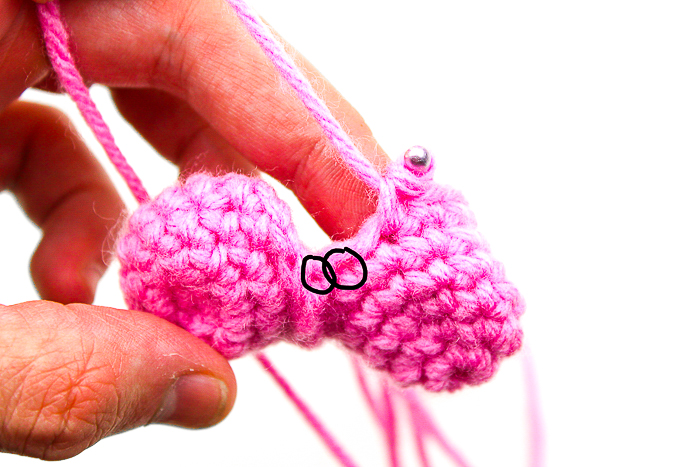
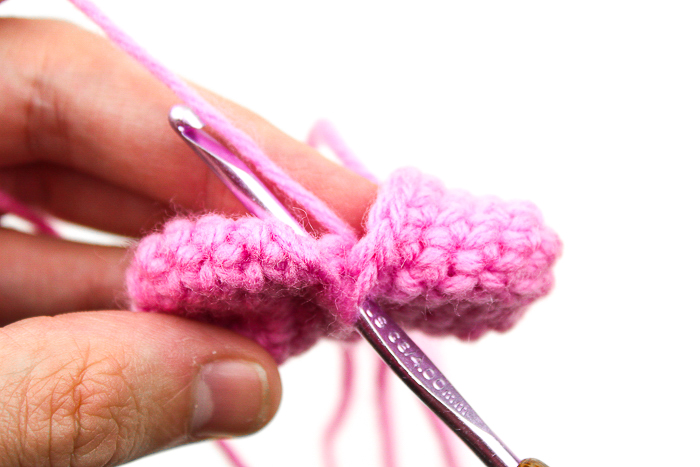
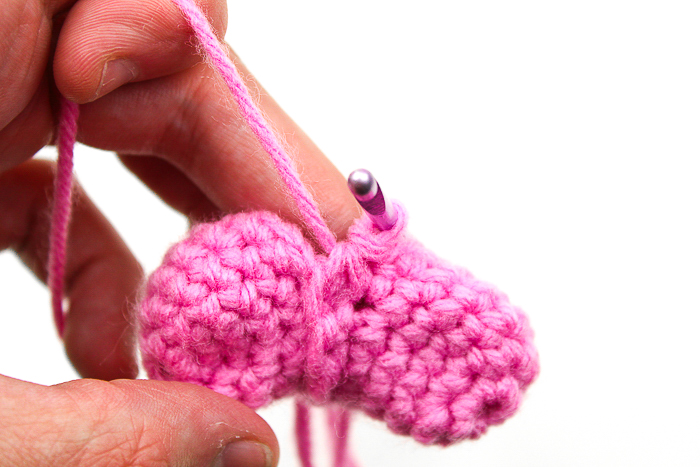
The hardest part is now done! Congratulations on connecting those two, not the easiest. So now it only gets easier from here!
It’s time to work in the round. For the next 2 rounds, sc around the piece. There should be a total of 18 stitches! Here is how this will look after your two rounds:
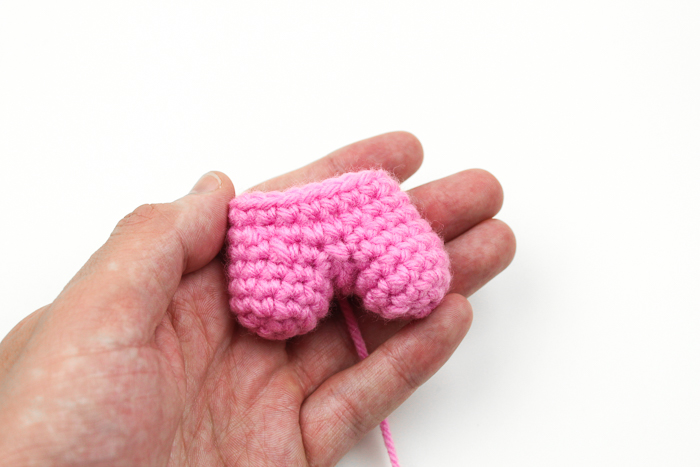
Be sure to start stuffing firmly!
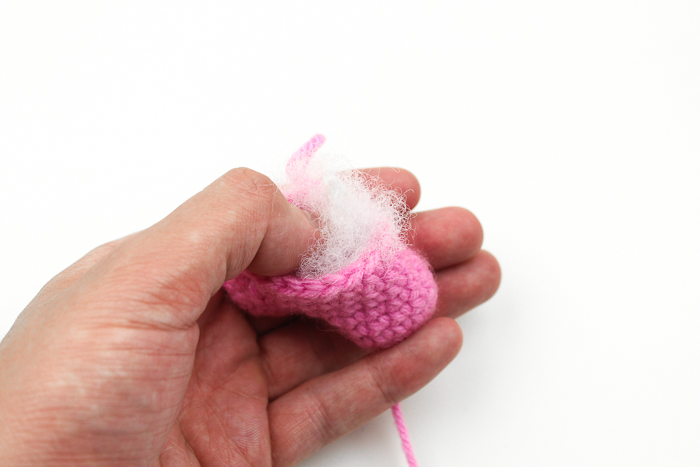
In the next round, repeat a *Sc, dec* around. This will leave you with 12 stitches! Written, it looks like; Round 1: *Sc, dec* around (12)
Round 2: Sc around (12)
Here is how it should look in the end! You will end up with 10 rounds in total.

Do the second one sc together with 4 sc sc in next 8 until first divot (last stitch is in the same one where the other loop ends)* sc in next 8, dec. (18)
Now that you have the full body as well as the bottom bone, it’s time to attach them together! We will be sewing the bottom half into the back loops that were left from Rnd 28 of the main body, seen here:
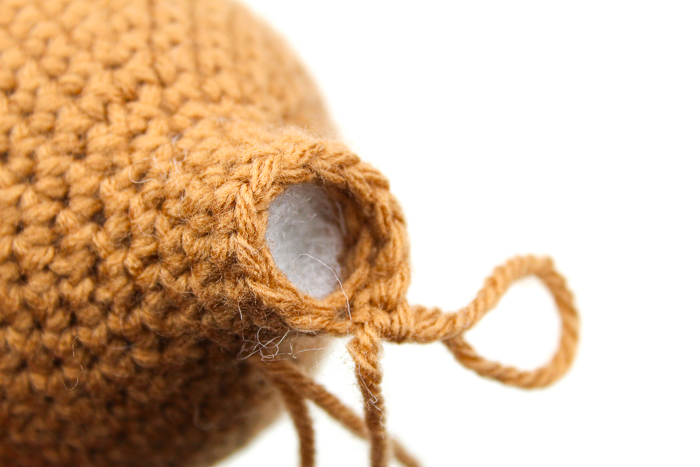
Using the tail from the bone, you will be weaving in and out of the stitches, it can be difficult to do and see here but I know you can do it! Take it slow.
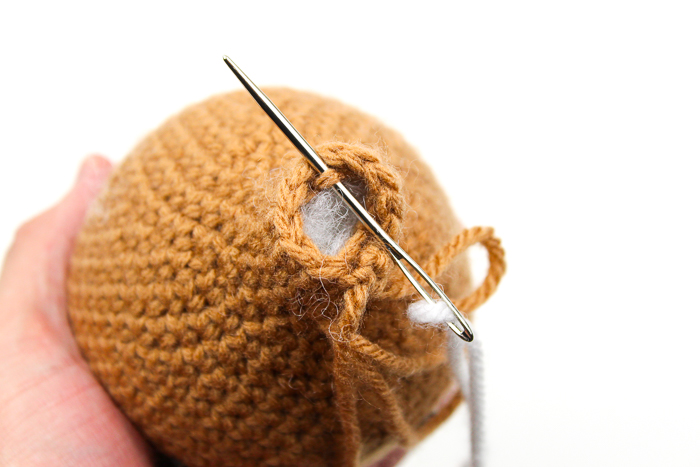
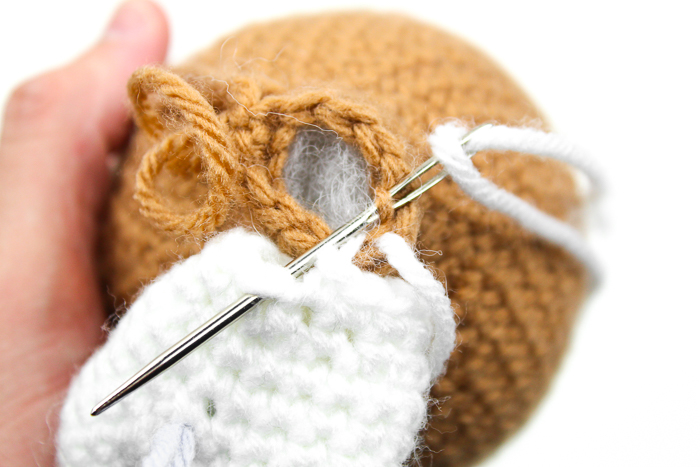
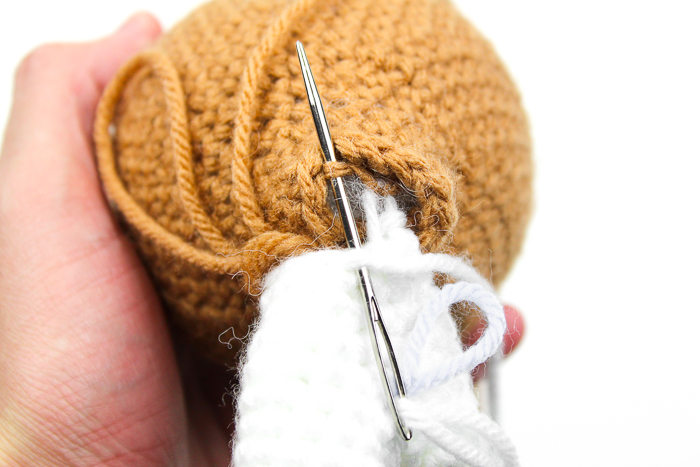
Now it’s attached! As we said above for the main body portion, we would be revisiting the last round. Now is that time! For the next round of the main body (in camel) we will single crochet around. It will begin to flip up but once you’re done with the round, you can just flip it down!
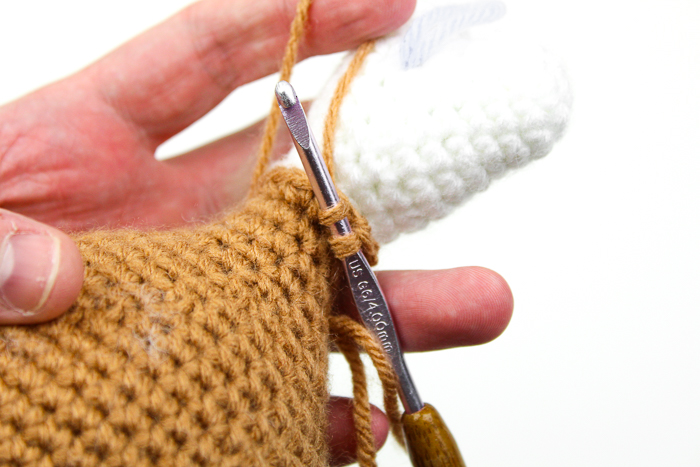
Weave in your ends and now you’re all done!
Optional: If you want to add a little more flair, you can make a bow as well!
To do this, let’s begin in orange (festive colors for fall!)
Ch 10
Row 1: In second chain from hook, sc. Sc across (9)
Row 2 – 11: Ch 1, turn. Sc across (9)
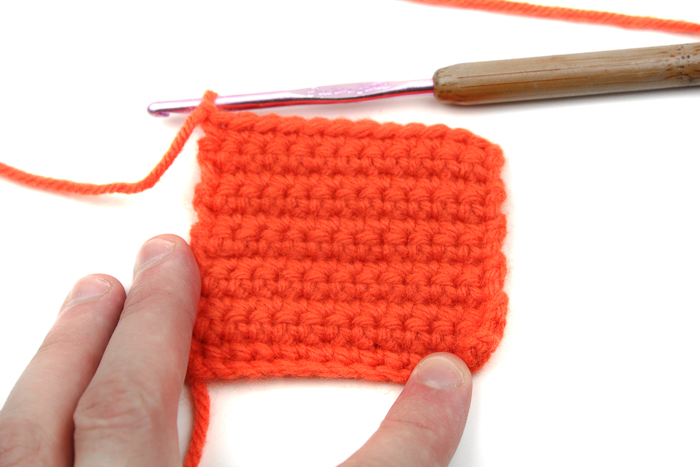
Row 12: Ch 1. Going around the sides, sc into each stitch around.
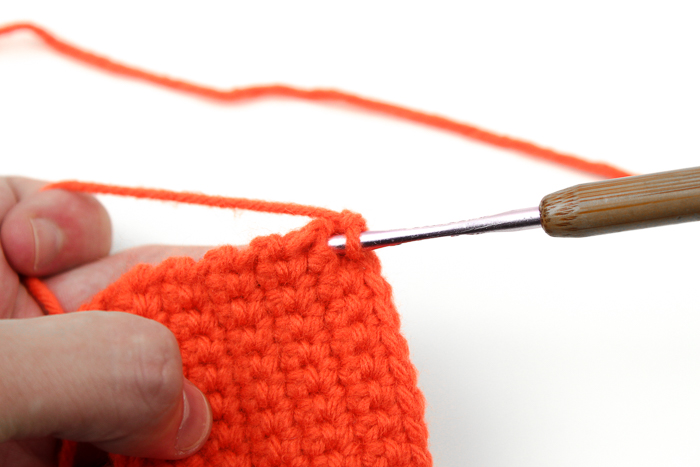
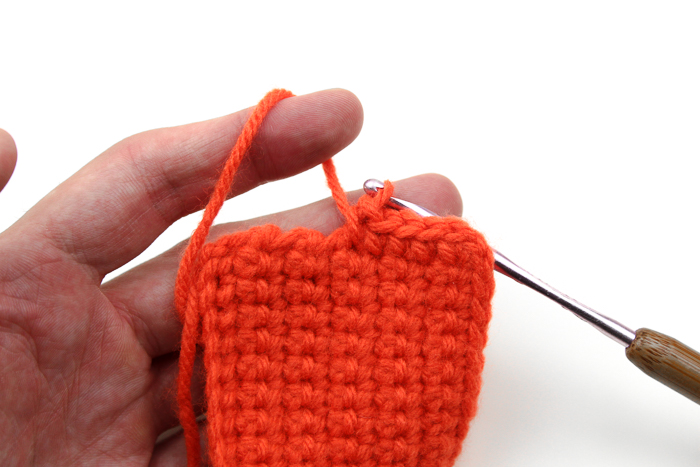
When you reach the corners, insert 3 single crochet into the same corner stitch.
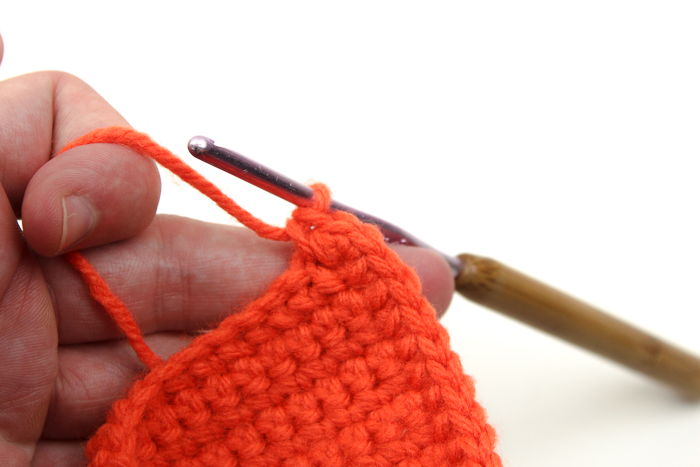
Weave in your ends and you should have your solid square! Pull your yellow yarn through the center – squish your piece so it folds on itself!
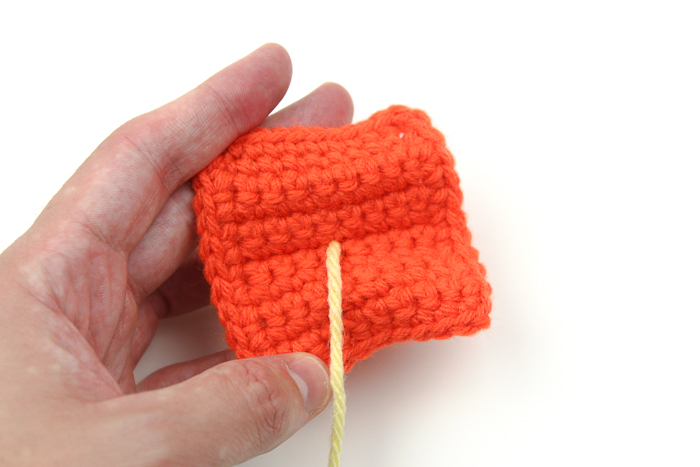

Now start wrapping your working yarn very tightly around! You may choose how thick you would like the center to be.

Weave your tail through the back and finish off.
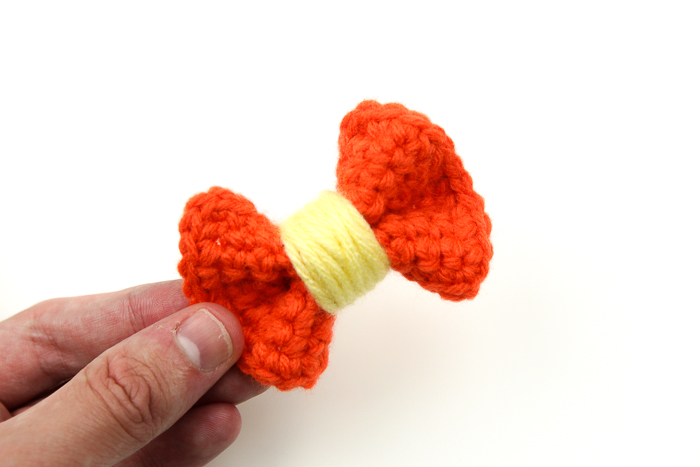
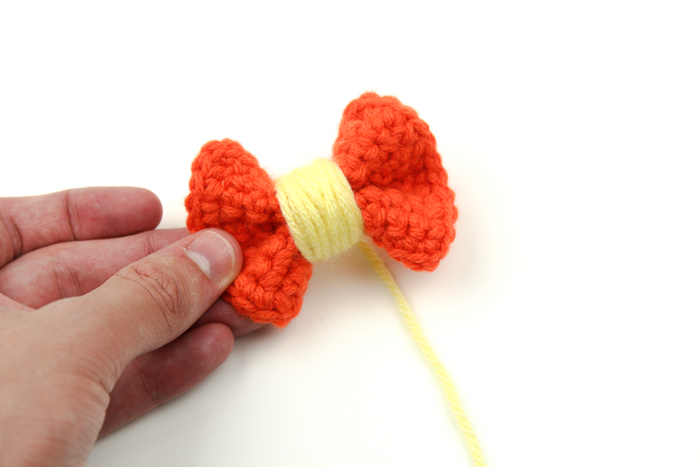
All done!
Thank you so much for visiting my blog and taking the time to make this really fun project with JOANN and I – I hope this brings you some time to focus on your gratitude during this season and maybe you can even share this turkey leg with some of those special people in your life!

All editorial content and projects are intellectual property of Vincent Green-Hite, designer of Knot Bad.
This post was sponsored by JOANN Stores but all ideas and opinions are my own. Please do not claim this pattern as your own. If you wish to share this pattern, you may link to this pattern but please do not reprint it on your site. You may keep a copy for your own personal use but please DO NOT sell the pattern or distribute it. You may sell products made from this pattern but please clearly credit the design to Knot Bad and link it my website knotbadami.com Make sure to post it! Use the hashtag #yarnpunk and #handmadewithjoann when posting it and please feel free to tag me and show me how yours turned out! You can also find the Facebook group and subreddit r/yarnpunk to post to as well!

