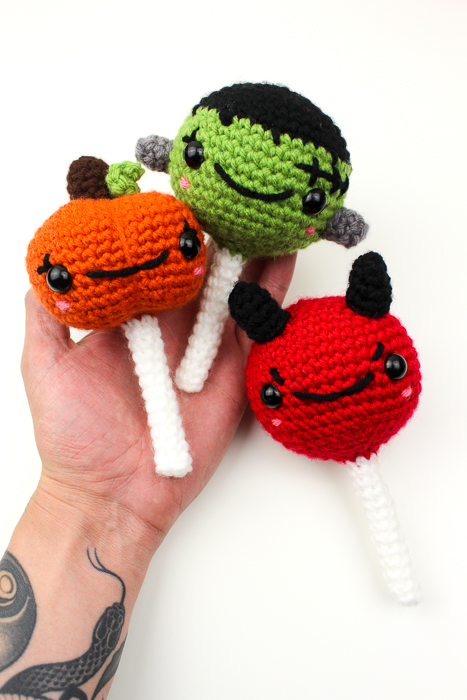
Monster Cake Pops
This post was sponsored by JOANN – My favorite craft store to visit for all my yarn and tools that I use. Also, you can’t resist all their coupons!
Trick or treat! But today, it’s all about eh treat that’s involved – my Halloween Monster Cake Pops! Way back when I was a kid I remember so vividly eating little cake pops / lollipops for Halloween.
It was always so fun to see who was on them. And plus, cake pops are super tasty and I do still sometimes treat myself out to them when I’m at a coffee shop.
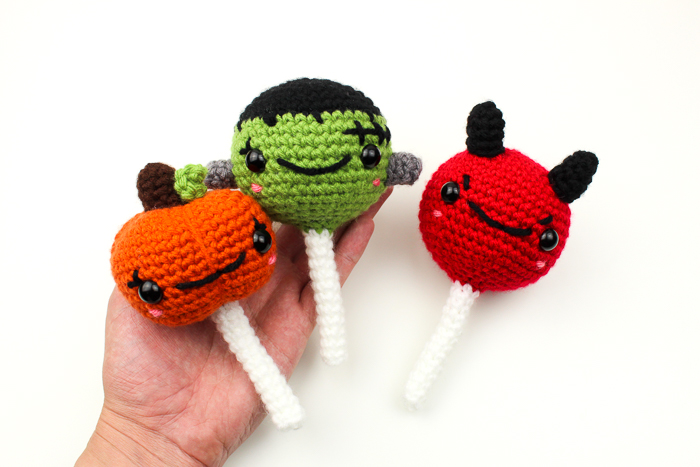
Well, for the spooky season, I wanted to bring that nostalgic childhood memory back – so with that in mind, I created some Monster Cake Pops! From the free pattern below, you can make your own Demon, Pumpkin, and / or Frankenstein’s Monster!
If you’re avoiding the extra sugar, these can be just as sweet.
So with JOANN’s help, I bring these to life! JOANN is always trying to find ways to bring creativity to your homes all year round, but they absolutely kill it when it comes to the holidays. I am so glad I can aid in that as well! With me already hyping them up, they are a great place to decorate your home with even more home décor and projects!
Halloween is full of treats and sweets, will you be making your own monster cake pops? Let me know who else you would like to see as this fun little treat down in the comments below!

All editorial content and projects are intellectual property of Vincent Green-Hite, designer of Knot Bad. This post was sponsored by JOANN Stores but all ideas and opinions are my own.
Please do not claim this pattern as your own. If you wish to share this pattern, you may link to this pattern but please do not reprint it on your site. You may keep a copy for your own personal use but please DO NOT sell the pattern or distribute it.
You may sell products made from this pattern but please clearly credit the design to Knot Bad and link it my website knotbadami.com
Make sure to post it! Use the hashtag #yarnpunk when posting it and please feel free to tag me and show me how yours turned out! You can also find the Facebook group and subreddit r/yarnpunk to post to as well!
Don’t forget to pin this pattern for later! It can be easy to forget so make sure you have this tucked away for a rainy day on your Pinterest Boards!
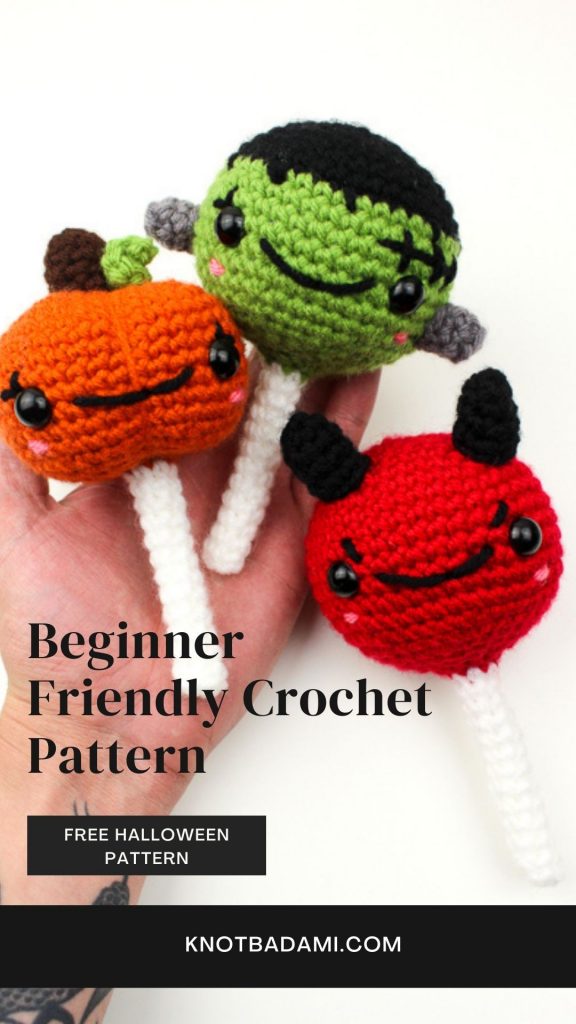
All the yarns can be substituted with any worsted weight yarn*
1 Skein in JOANN Big Twist Value (In Black)
1 Skein in JOANN Big Twist Value (In Orange)
1 Skein in JOANN Big Twist Value (In Brown)
1 Skein in JOANN Big Twist Value (In Varsity Red)
1 Skein in JOANN Big Twist Value (In Light Green)
1 Skein in JOANN Big Twist Value (In White)
1 Skein in JOANN Big Twist Value (In Grey)
1 Skein in JOANN Big Twist Value (In Pink))
2 x 12mm Safety Eyes (For each)
(Click the photo to get the safety eyes I use for all my dolls!)
Dimensions
Height: 4″ inches roughly
Width: 3″ inches roughly
Skill Level:
Easy+
Abbreviations (In US terms)
Sl st – Slip Stitch
Ch – chain
Sc – Single Crochet
Inc – Increase
Dec – Decrease
CS – Crab Stitch
* *- Repeat
FO -Finish Off
Notes:
- This pattern is worked in the round and not joined.
- This pattern is written in US terms.
- Find my How-To Video on the Magic Ring HERE!
- The pattern will guide you in how to make the pieces – at the bottom will be where you find the assembly
- You can find helpful tutorials throughout, but if you would like to find some of my tips and tricks you can head HERE!
Lets Get Started
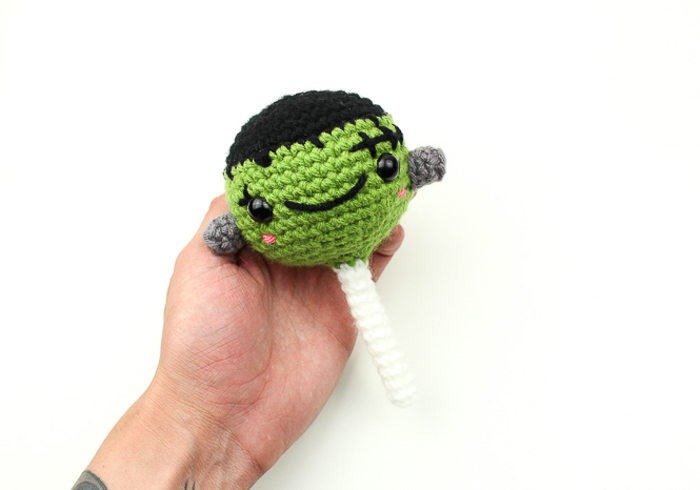
Frankenstein’s Monster
Main Body
(Begin in Black)
Rnd 1: 6 Single crochet into Magic Ring (6) (Click here for video tutorial!)
Rnd 2: *Inc* around (12)
Rnd 3: *Sc, Inc* around (18)
Rnd 4: *Sc 2, Inc* around (24)
Rnd 5: *Sc 3, Inc* around (30)
Rnd 6: *Sc 4, Inc* around (36)
Rnd 7: *Sc 5, Inc* around (42)
Rnd 8: Sc around (42)
Switch to Green
Rnd 9 – 14: Sc around (42)
Rnd 15: *Sc 5, Dec* around (36)
Rnd 16: *Sc 4, Dec* around (30)
Rnd 17: *Sc 3, Dec* around (24)
Insert eyes into Rnd 12 (starting from center of Magic Ring) with 9 stitches apart
Rnd 18: *Sc 2, Dec* around (18)
Rnd 19: *Sc, Dec* around (12)
Rnd 20: Dec around (6)
Switch to white
Rnd 21 – 32: Sc around (6)
Continue stuffing lightly in the stick!
Finish off.
Screws (Make 2)
Begin in Grey
Rnd 1: 6 Single crochet into Magic Ring (6)
Rnd 2: Sc in BLO (6)
Rnd 3: Sc around (6)
Finish off and leave tail for sewing
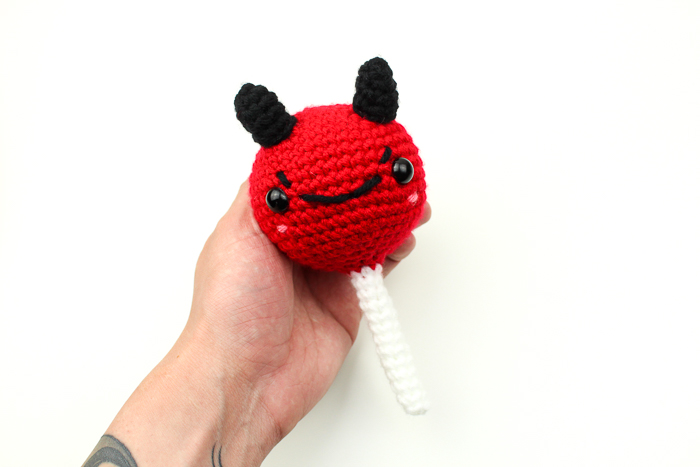
Demon / Devil
Main Body
(Begin in Red)
Rnd 1: 6 Single crochet into Magic Ring (6) (Click here for video tutorial!)
Rnd 2: *Inc* around (12)
Rnd 3: *Sc, Inc* around (18)
Rnd 4: *Sc 2, Inc* around (24)
Rnd 5: *Sc 3, Inc* around (30)
Rnd 6: *Sc 4, Inc* around (36)
Rnd 7: *Sc 5, Inc* around (42)
Rnd 8 – 14: Sc around (42)
Rnd 15: *Sc 5, Dec* around (36)
Rnd 16: *Sc 4, Dec* around (30)
Rnd 17: *Sc 3, Dec* around (24)
Insert eyes into Rnd 12 (starting from center of Magic Ring) with 9 stitches apart
Rnd 18: *Sc 2, Dec* around (18)
Rnd 19: *Sc, Dec* around (12)
Rnd 20: Dec around (6)
Switch to white
Rnd 21 – 32: Sc around (6)
Continue stuffing lightly in the stick!
Finish off.
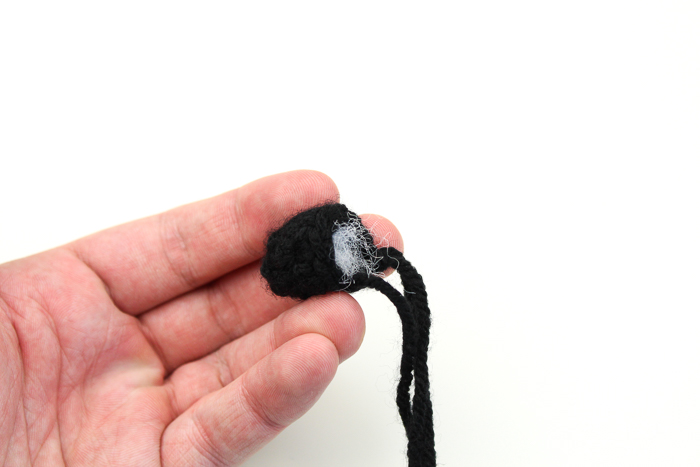
Horns (Make 2)
Begin in Black
Rnd 1: 5 Single crochet into Magic Ring (5)
Rnd 2: Inc into first stitch, sc into next 4 stitches. (6)
Rnd 3: Inc into first stitch, sc into next 5 stitches. (7)
Rnd 4: Inc into first stitch, sc into next 4 stitches, dec into last two stitches. (7)
Rnd 5: Inc into first stitch, sc into next 4 stitches, dec into last two stitches. (7)
Finish off and leave tail for sewing. Don’t forget to stuff!
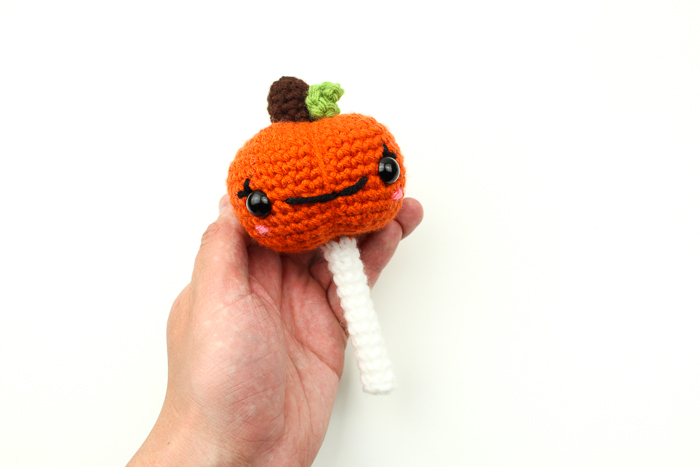
Pumpkin
Main Body
(Begin in Orange)
Rnd 1: 6 Single crochet into Magic Ring (6)
Rnd 2: *Inc* around (12)
Rnd 3: *Sc, Inc* around (18)
Rnd 4: *Sc 2, Inc* around (24)
Rnd 5: *Sc 3, Inc* around (30)
Rnd 6: *Sc 4, Inc* around (36)
Rnd 7: *Sc 5, Inc* around (42)
Rnd 8 – 14: Sc around (42)
Rnd 15: *Sc 5, Dec* around (36)
Rnd 16: *Sc 4, Dec* around (30)
Rnd 17: *Sc 3, Dec* around (24)
Insert eyes into Rnd 12 (starting from center of Magic Ring) with 9 stitches apart
Rnd 18: *Sc 2, Dec* around (18)
Rnd 19: *Sc, Dec* around (12)
Rnd 20: Dec around (6)
Switch to white
Rnd 21 – 32: Sc around (6)
Continue stuffing lightly in the stick!
Finish off.
Details!
Let’s make this pumpkin look more like a pumpkin!
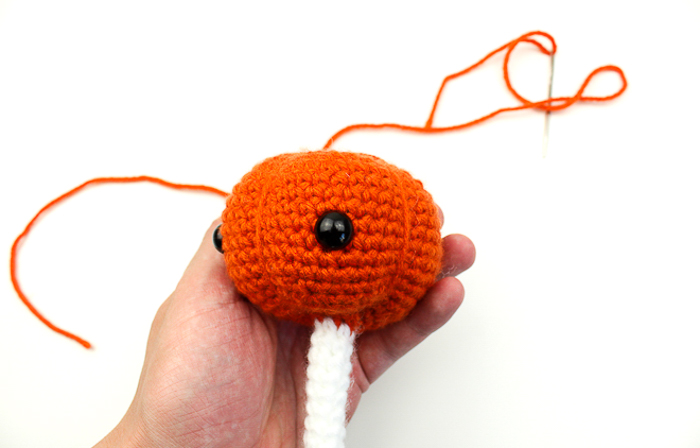
Attach your yarn to the very top of the pumpkin body. With your long working strand (you can weave your tail in afterword!) pull along the body until you reach underneath (between the eyes!) like so:
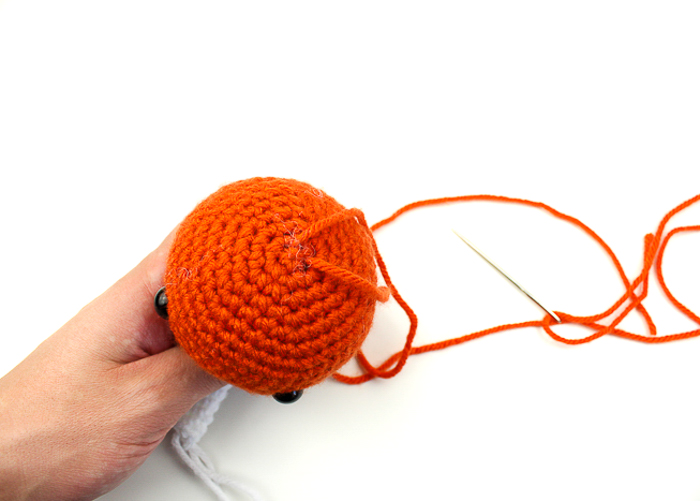
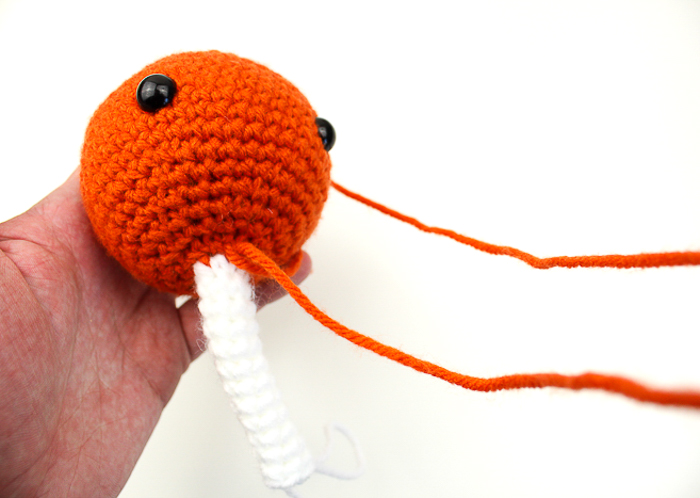
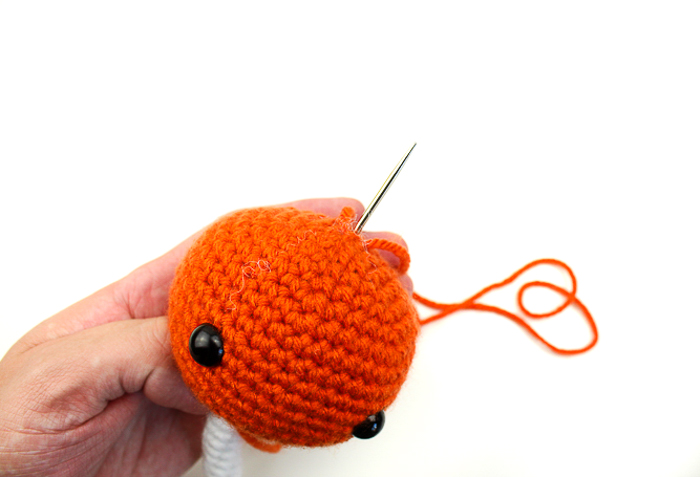
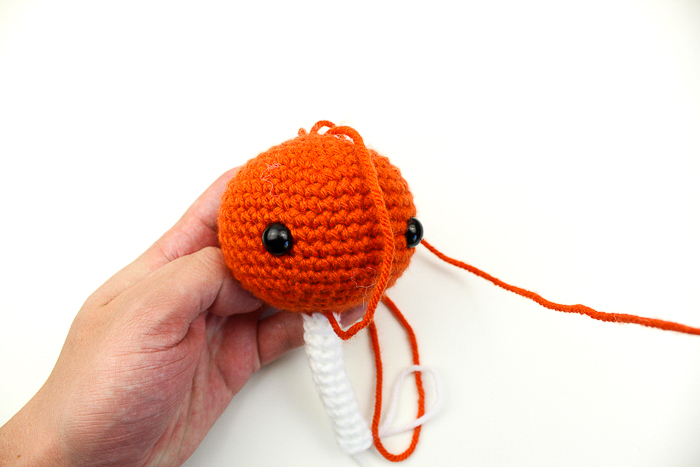
Now pull tight!

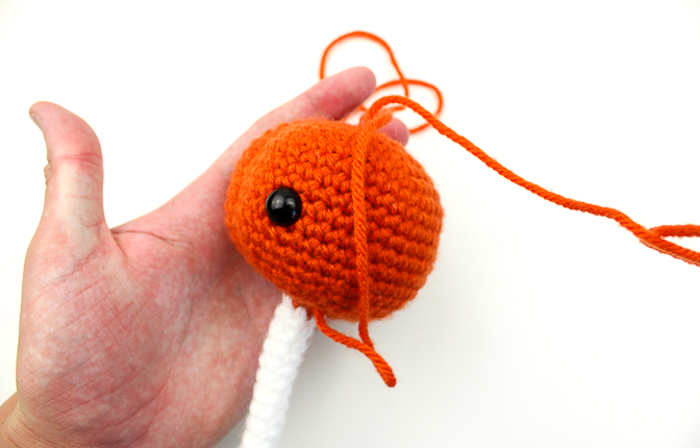
You will do this 3 more times around the entire body!
Stem
(Begin in Brown)
Rnd 1: 6 Single crochet into Magic Ring (6)
Rnd 2: *Sc, Inc* around (9)
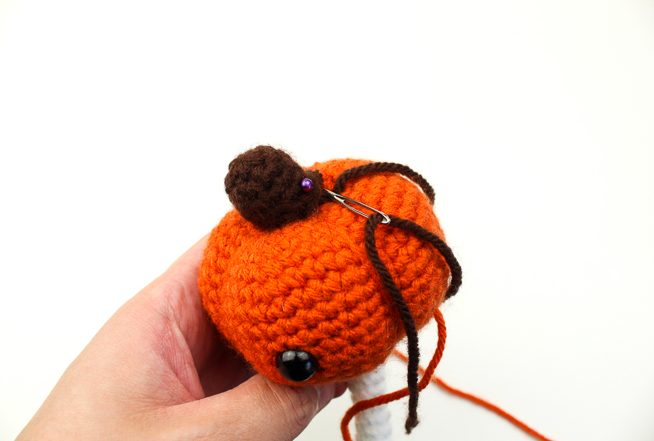
Rnd 3 – 5: Sc around (9)
Finish off and leave tail for sewing as seen below!
Leaf
(Begin in Green)
Ch 7
Sc into second chain from hook. Do one more sc into the same stitch. In each stitch across, do a sc in into each stitch (so you’re doing two single crochets into each stitch across!)
Finish off and leave tail for sewing
You’re all done!

All editorial content and projects are intellectual property of Vincent Green-Hite, designer of Knot Bad. This post was sponsored by JOANN Stores but all ideas and opinions are my own.
Please do not claim this pattern as your own. If you wish to share this pattern, you may link to this pattern but please do not reprint it on your site. You may keep a copy for your own personal use but please DO NOT sell the pattern or distribute it.
You may sell products made from this pattern but please clearly credit the design to Knot Bad and link it my website knotbadami.com
Make sure to post it! Use the hashtag #yarnpunk when posting it and please feel free to tag me and show me how yours turned out! You can also find the Facebook group and subreddit r/yarnpunk to post to as well!

